
数据准备
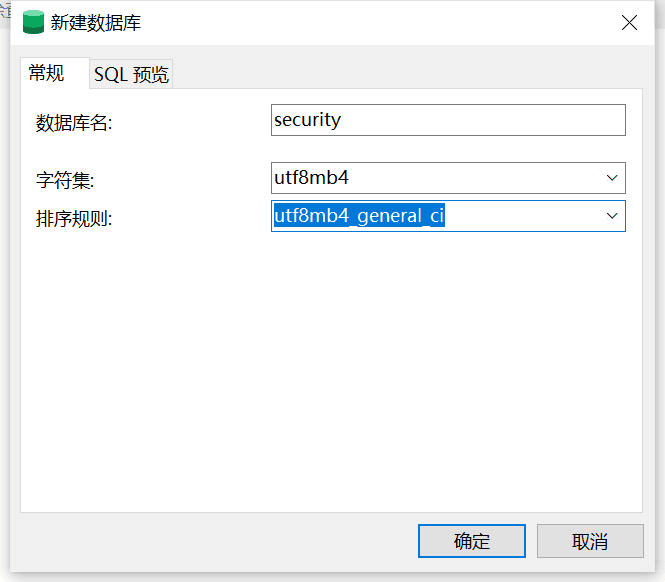
创建数据库
创建数据库表
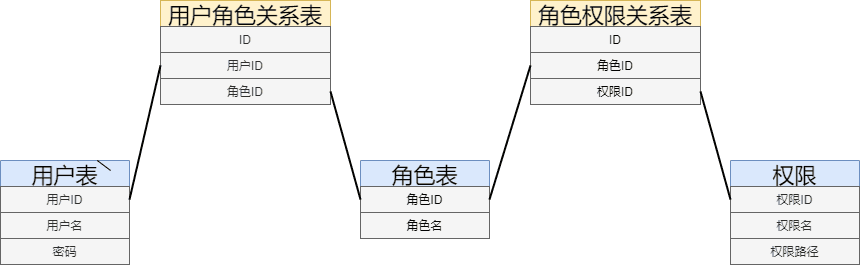
创建下面5张表,包含了最主要的权限管理功能。
t_user(用户表):存储用户信息,包括用户ID、用户名和密码等。
t_role(角色表):存储角色信息,每个角色也有一个唯一的标识符和名称。
t_permission(权限表):存储权限信息,每个权限都有一个唯一的标识符和名称。
t_user_role(用户角色关系表):存储用户和角色之间的关系,即哪个用户拥有哪些角色。
t_role_permission(角色权限关系表):存储角色和权限之间的关系,即哪个角色拥有哪些权限。
每张表都有一个IS_DELETE字段,用于标记是否被逻辑删除。
每张表都有CREATE_TIME和UPDATE_TIME字段,用于记录创建时间和最后更新时间。
每张表都有CREATE_USER和UPDATE_USER字段,用于记录创建者和最后更新者的用户信息。
查看代码
SET NAMES utf8mb4;
SET FOREIGN_KEY_CHECKS = 0;
-- ----------------------------
-- Table structure for t_permission
-- ----------------------------
DROP TABLE IF EXISTS `t_permission`;
CREATE TABLE `t_permission`  (
  `permission_id` varchar(32) CHARACTER SET utf8mb4 COLLATE utf8mb4_0900_ai_ci NOT NULL,
  `permission_name` varchar(50) CHARACTER SET utf8mb4 COLLATE utf8mb4_0900_ai_ci NOT NULL,
  `IS_DELETE` bit(1) NOT NULL DEFAULT b'0',
  `CREATE_TIME` timestamp NULL DEFAULT NULL,
  `CREATE_USER` varchar(50) CHARACTER SET utf8mb4 COLLATE utf8mb4_0900_ai_ci NULL DEFAULT NULL,
  `UPDATE_TIME` timestamp NULL DEFAULT NULL,
  `UPDATE_USER` varchar(50) CHARACTER SET utf8mb4 COLLATE utf8mb4_0900_ai_ci NULL DEFAULT NULL,
  PRIMARY KEY (`permission_id`) USING BTREE
) ENGINE = InnoDB CHARACTER SET = utf8mb4 COLLATE = utf8mb4_0900_ai_ci COMMENT = '权限表' ROW_FORMAT = Dynamic;
-- ----------------------------
-- Table structure for t_role
-- ----------------------------
DROP TABLE IF EXISTS `t_role`;
CREATE TABLE `t_role`  (
  `role_id` varchar(32) CHARACTER SET utf8mb4 COLLATE utf8mb4_0900_ai_ci NOT NULL,
  `role_name` varchar(50) CHARACTER SET utf8mb4 COLLATE utf8mb4_0900_ai_ci NOT NULL,
  `IS_DELETE` bit(1) NOT NULL DEFAULT b'0',
  `CREATE_TIME` timestamp NULL DEFAULT NULL,
  `CREATE_USER` varchar(50) CHARACTER SET utf8mb4 COLLATE utf8mb4_0900_ai_ci NULL DEFAULT NULL,
  `UPDATE_TIME` timestamp NULL DEFAULT NULL,
  `UPDATE_USER` varchar(50) CHARACTER SET utf8mb4 COLLATE utf8mb4_0900_ai_ci NULL DEFAULT NULL,
  PRIMARY KEY (`role_id`) USING BTREE
) ENGINE = InnoDB CHARACTER SET = utf8mb4 COLLATE = utf8mb4_0900_ai_ci COMMENT = '角色表' ROW_FORMAT = Dynamic;
-- ----------------------------
-- Table structure for t_role_permission
-- ----------------------------
DROP TABLE IF EXISTS `t_role_permission`;
CREATE TABLE `t_role_permission`  (
  `id` varchar(32) CHARACTER SET utf8mb4 COLLATE utf8mb4_0900_ai_ci NOT NULL,
  `role_id` varchar(32) CHARACTER SET utf8mb4 COLLATE utf8mb4_0900_ai_ci NOT NULL,
  `permission_id` varchar(32) CHARACTER SET utf8mb4 COLLATE utf8mb4_0900_ai_ci NOT NULL,
  `IS_DELETE` bit(1) NOT NULL DEFAULT b'0',
  `CREATE_TIME` timestamp NULL DEFAULT NULL,
  `CREATE_USER` varchar(50) CHARACTER SET utf8mb4 COLLATE utf8mb4_0900_ai_ci NULL DEFAULT NULL,
  `UPDATE_TIME` timestamp NULL DEFAULT NULL,
  `UPDATE_USER` varchar(50) CHARACTER SET utf8mb4 COLLATE utf8mb4_0900_ai_ci NULL DEFAULT NULL,
  PRIMARY KEY (`id`) USING BTREE,
  UNIQUE INDEX `user_role_idx`(`role_id` ASC, `permission_id` ASC) USING BTREE
) ENGINE = InnoDB CHARACTER SET = utf8mb4 COLLATE = utf8mb4_0900_ai_ci COMMENT = '角色权限关系表' ROW_FORMAT = Dynamic;
-- ----------------------------
-- Table structure for t_user
-- ----------------------------
DROP TABLE IF EXISTS `t_user`;
CREATE TABLE `t_user`  (
  `USER_ID` varchar(32) CHARACTER SET utf8mb4 COLLATE utf8mb4_0900_ai_ci NOT NULL,
  `USER_NAME` varchar(50) CHARACTER SET utf8mb4 COLLATE utf8mb4_0900_ai_ci NULL DEFAULT NULL,
  `PASSWORD` varchar(50) CHARACTER SET utf8mb4 COLLATE utf8mb4_0900_ai_ci NULL DEFAULT NULL,
  `IS_DELETE` bit(1) NOT NULL DEFAULT b'0',
  `CREATE_TIME` timestamp NULL DEFAULT NULL,
  `CREATE_USER` varchar(50) CHARACTER SET utf8mb4 COLLATE utf8mb4_0900_ai_ci NULL DEFAULT NULL,
  `UPDATE_TIME` timestamp NULL DEFAULT NULL,
  `UPDATE_USER` varchar(50) CHARACTER SET utf8mb4 COLLATE utf8mb4_0900_ai_ci NULL DEFAULT NULL,
  PRIMARY KEY (`USER_ID`) USING BTREE
) ENGINE = InnoDB CHARACTER SET = utf8mb4 COLLATE = utf8mb4_0900_ai_ci COMMENT = '用户表' ROW_FORMAT = Dynamic;
-- ----------------------------
-- Table structure for t_user_role
-- ----------------------------
DROP TABLE IF EXISTS `t_user_role`;
CREATE TABLE `t_user_role`  (
  `id` varchar(32) CHARACTER SET utf8mb4 COLLATE utf8mb4_0900_ai_ci NOT NULL,
  `user_id` varchar(32) CHARACTER SET utf8mb4 COLLATE utf8mb4_0900_ai_ci NOT NULL,
  `role_id` varchar(32) CHARACTER SET utf8mb4 COLLATE utf8mb4_0900_ai_ci NOT NULL,
  `IS_DELETE` bit(1) NOT NULL DEFAULT b'0',
  `CREATE_TIME` timestamp NULL DEFAULT NULL,
  `CREATE_USER` varchar(50) CHARACTER SET utf8mb4 COLLATE utf8mb4_0900_ai_ci NULL DEFAULT NULL,
  `UPDATE_TIME` timestamp NULL DEFAULT NULL,
  `UPDATE_USER` varchar(50) CHARACTER SET utf8mb4 COLLATE utf8mb4_0900_ai_ci NULL DEFAULT NULL,
  PRIMARY KEY (`id`) USING BTREE,
  UNIQUE INDEX `user_role_idx`(`user_id` ASC, `role_id` ASC) USING BTREE
) ENGINE = InnoDB CHARACTER SET = utf8mb4 COLLATE = utf8mb4_0900_ai_ci COMMENT = '用户角色关系表' ROW_FORMAT = Dynamic;

SET FOREIGN_KEY_CHECKS = 1;
插入数据
插入两个权限(“设置”和“日志”),两个角色(“管理员”和“项目经理”),以及两个用户(“admin”和“经理1”)。
赋予管理员角色访问设置和日志的权限,只给项目经理角色访问日志的权限。
给用户“admin”分配管理员角色,因此具有访问设置和日志的权限,
给用户“经理1”被分配项目经理角色,只能访问日志。
| 用户 | 角色 | 访问权限 |
|---|---|---|
| admin | 管理员 | 设置, 日志 |
| 经理1 | 项目经理 | 日志 |
查看代码
-- ----------------------------
-- Records of t_permission
-- ----------------------------
INSERT INTO `t_permission` VALUES ('1', '设置', b'0', '2024-04-18 17:03:48', 'admin', '2024-04-18 17:03:51', 'admin');
INSERT INTO `t_permission` VALUES ('2', '日志', b'0', '2024-04-18 17:06:35', 'admin', '2024-04-18 17:06:37', 'admin');
-- ----------------------------
-- Records of t_role
-- ----------------------------
INSERT INTO `t_role` VALUES ('1', '管理员', b'0', '2024-04-18 17:02:37', 'admin', '2024-04-18 17:02:40', 'admin');
INSERT INTO `t_role` VALUES ('2', '项目经理', b'0', '2024-04-18 17:06:10', 'admin', '2024-04-18 17:06:12', 'admin');
-- ----------------------------
-- Records of t_role_permission
-- ----------------------------
INSERT INTO `t_role_permission` VALUES ('1', '1', '1', b'0', '2024-04-18 17:04:03', 'admin', '2024-04-18 17:04:08', 'admin');
INSERT INTO `t_role_permission` VALUES ('2', '1', '2', b'0', '2024-04-18 17:08:31', 'admin', '2024-04-18 17:08:34', 'admin');
INSERT INTO `t_role_permission` VALUES ('3', '2', '2', b'0', '2024-04-18 17:08:48', 'admin', '2024-04-18 17:08:51', 'admin');
-- ----------------------------
-- Records of t_user
-- ----------------------------
INSERT INTO `t_user` VALUES ('1', 'admin', '123456', b'0', '2024-04-18 17:01:19', 'admin', '2024-04-18 17:01:30', 'admin');
INSERT INTO `t_user` VALUES ('2', '经理1', '1234', b'0', '2024-04-18 17:05:37', 'admin', '2024-04-18 17:05:42', 'admin');

-- ----------------------------
-- Records of t_user_role
-- ----------------------------
INSERT INTO `t_user_role` VALUES ('1', '1', '1', b'0', '2024-04-18 17:03:04', 'admin', '2024-04-18 17:03:10', 'admin');
INSERT INTO `t_user_role` VALUES ('2', '2', '2', b'0', '2024-04-18 17:07:28', 'admin', '2024-04-18 17:07:31', 'admin');
创建项目
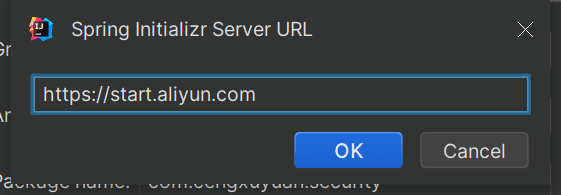
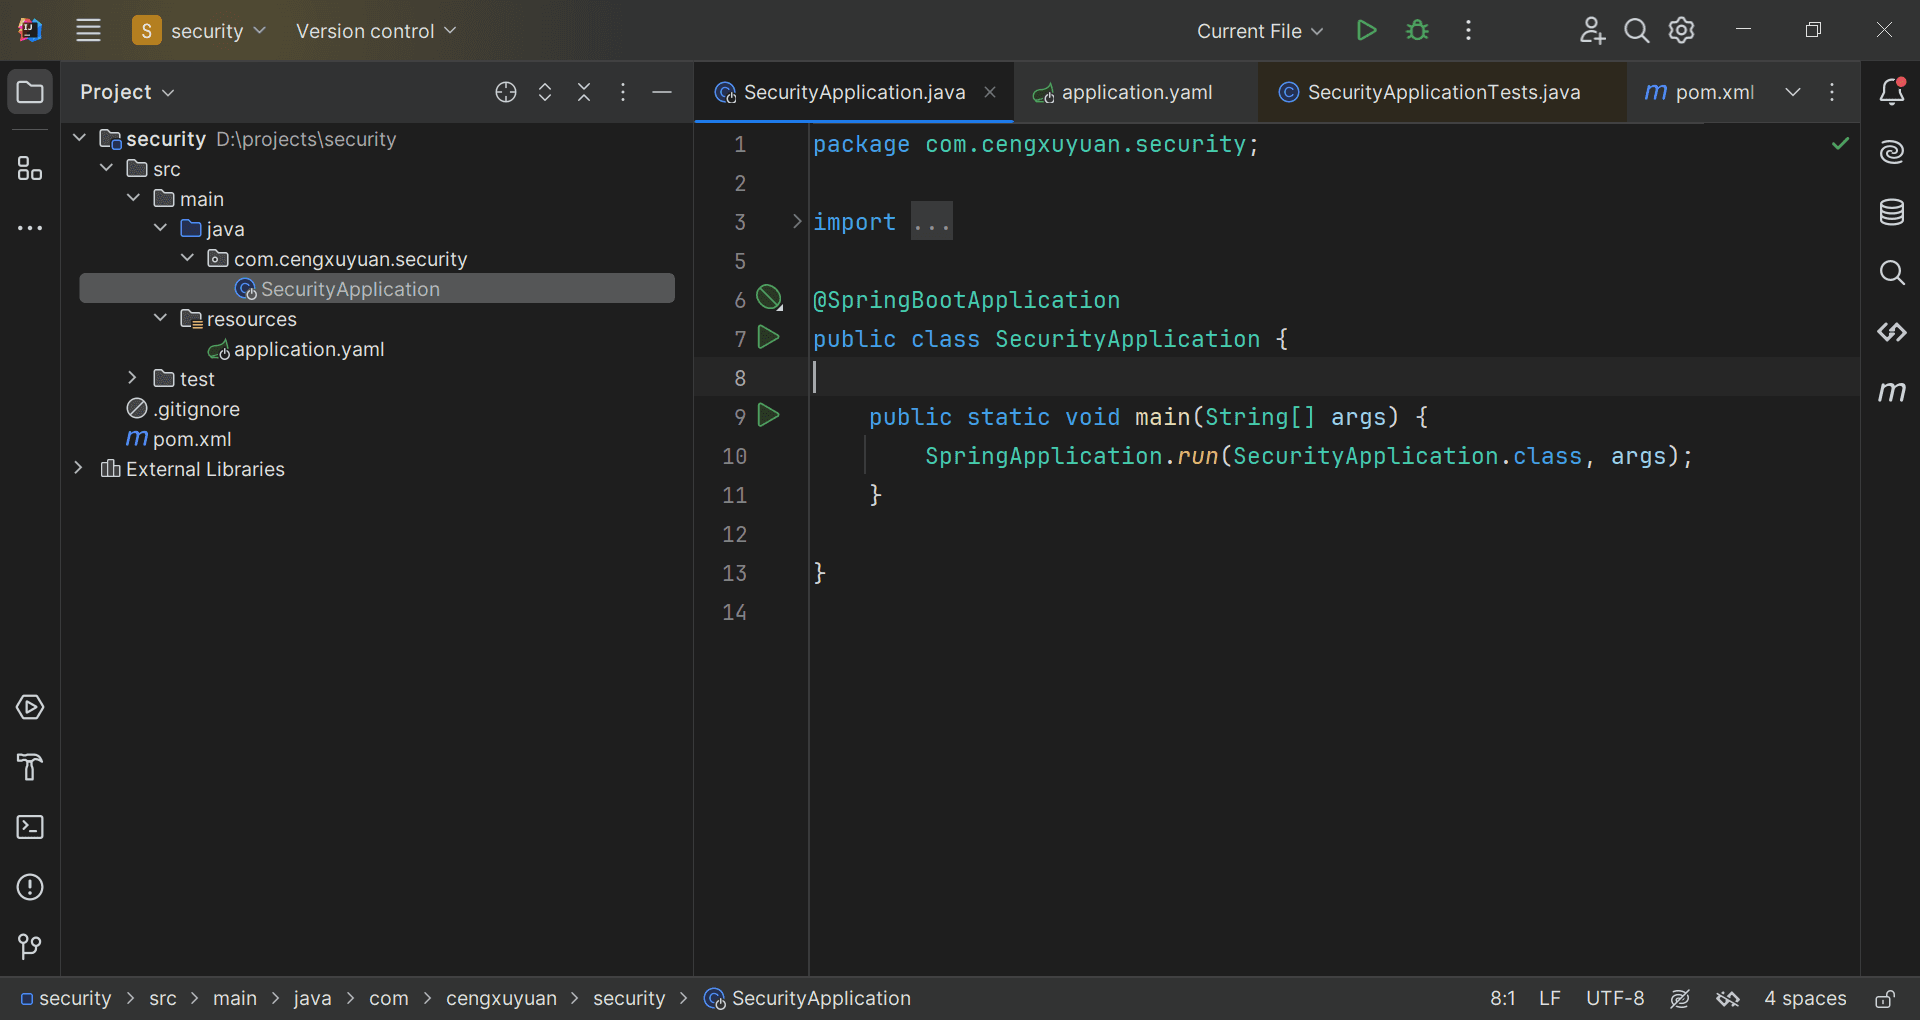
Spring Initializr不再提供Java8选项,我们修改Server URL 即可:https://start.aliyun.com/
选择java8 + maven。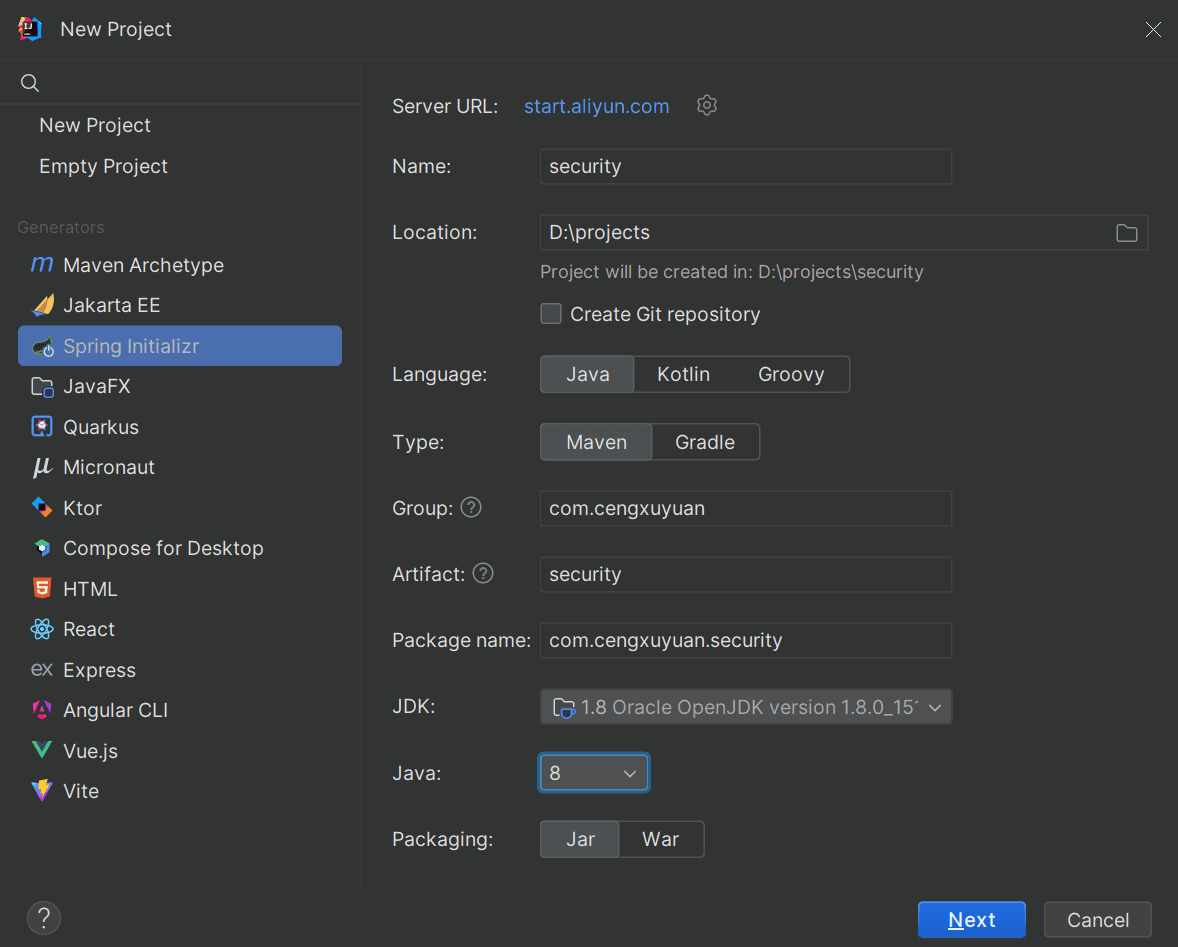
SpringBoot选择2.7.6,添加一些常规依赖。
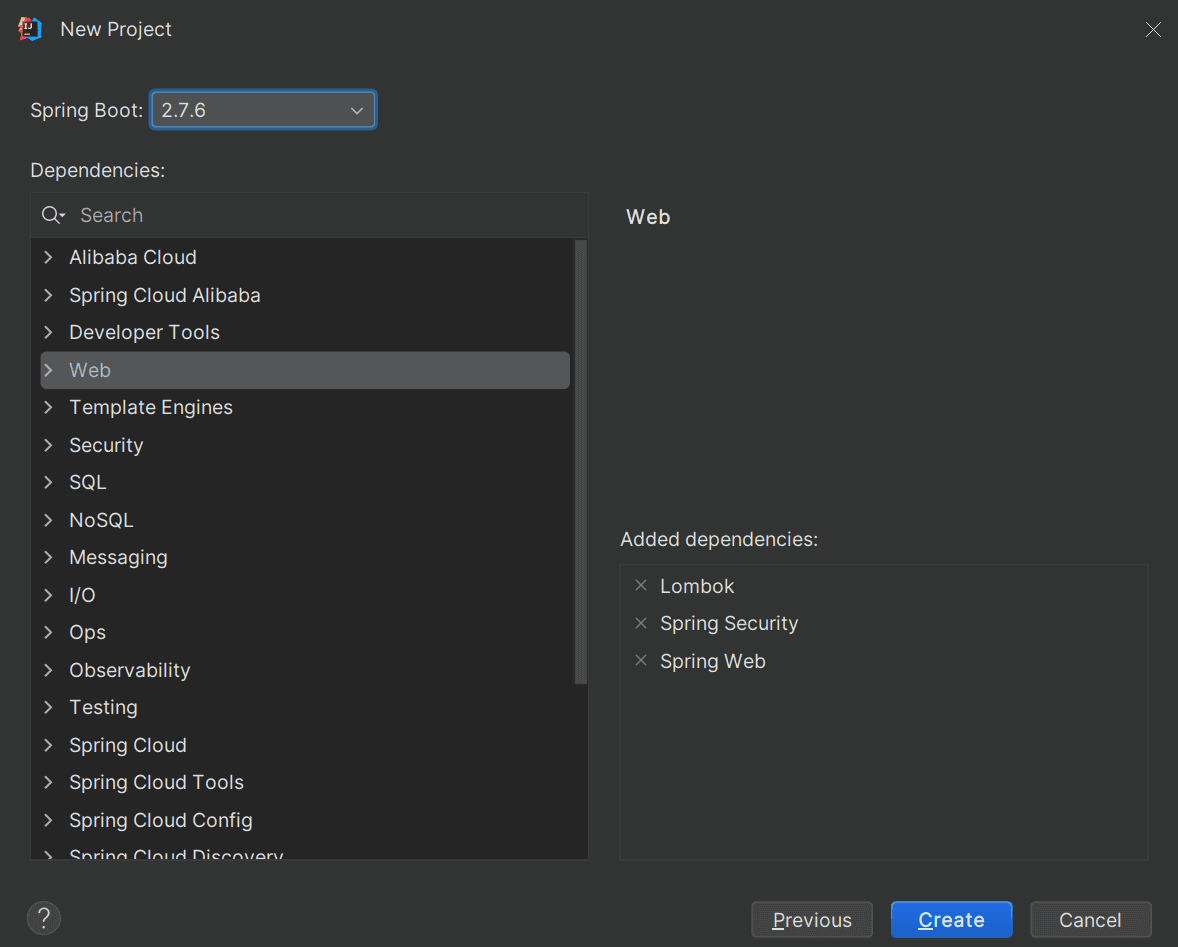
新建项目如图。
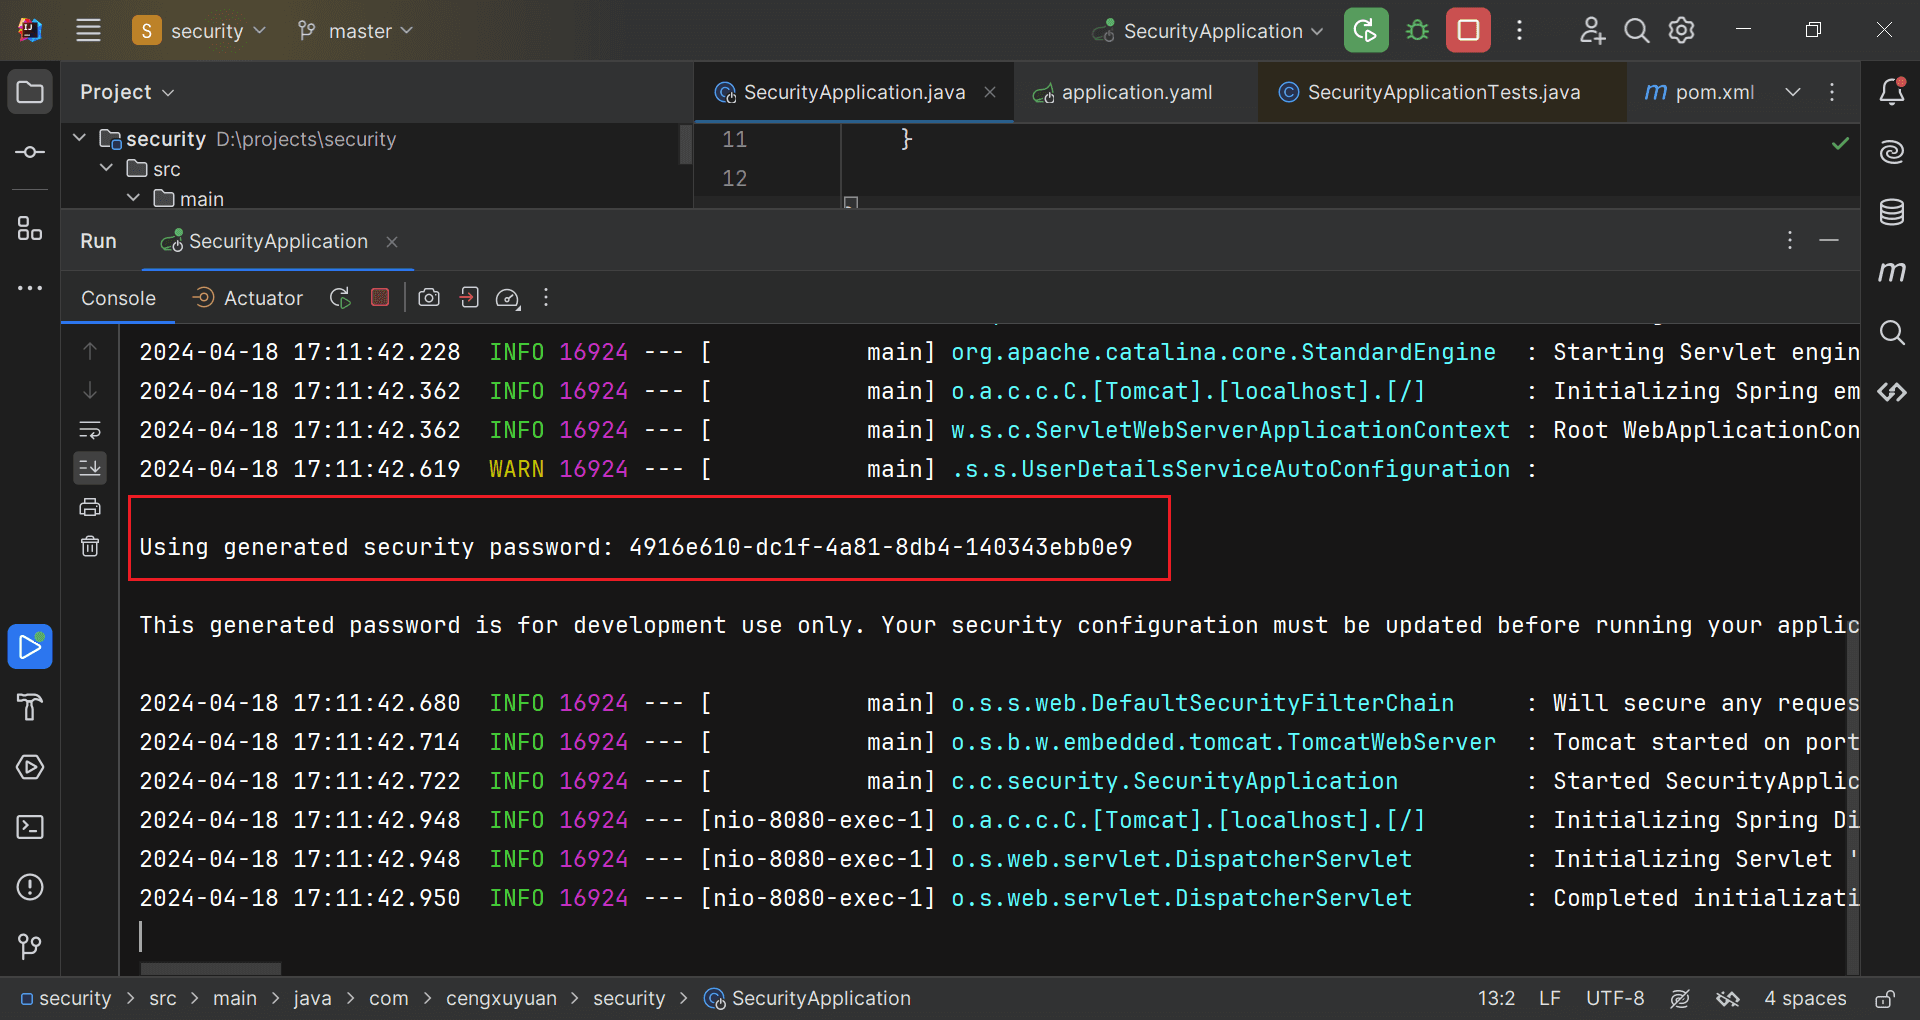
启动项目,可以看到控制台输出了security的默认密码。
数据传输对象
定义一个用于前后端交互的数据传输对象,十分常用。
查看代码
@Data
@NoArgsConstructor
@AllArgsConstructor
public class Result {
    private Boolean success;
    private String msg;
    private Object data;

    public static Result success(){
        return new Result(true, null, null);
    }
    public static Result success(Object data){
        return new Result(true, null, data);
    }
    public static Result fail(String msg){
        return new Result(false, msg, null);
    }
}
添加依赖
mysql-connector-java 是MySQL的官方JDBC驱动,它允许应用程序通过Java代码与MySQL数据库进行通信。
mybatis-plus-boot-starter 是MyBatis Plus的启动器,它集成了MyBatis并提供更多便利的特性。
mybatis-plus-generator 是MyBatis Plus的代码生成器,它能够自动生成Mapper、Entity等MyBatis所需的文件,简化开发流程。
velocity-engine-core 是Apache Velocity的模板引擎核心库,用于生成代码和配置文件。
查看代码
<dependency>
            <groupId>mysql</groupId>
            <artifactId>mysql-connector-java</artifactId>
        </dependency>
        <dependency>
            <groupId>com.baomidou</groupId>
            <artifactId>mybatis-plus-boot-starter</artifactId>
            <version>3.4.2</version>
        </dependency>
        <dependency>
            <groupId>com.baomidou</groupId>
            <artifactId>mybatis-plus-generator</artifactId>
            <version>3.5.3</version>
        </dependency>
        <dependency>
            <groupId>org.apache.velocity</groupId>
            <artifactId>velocity-engine-core</artifactId>
            <version>2.2</version>
        </dependency>
添加配置
配置服务器端口,MyBatis-Plus日志输出,Mysql数据库连接。
查看代码
server:
  port: 8080

mybatis-plus:
  configuration:
    log-impl: org.apache.ibatis.logging.stdout.StdOutImpl
  global-config:
    db-config:
      logic-delete-value: 1
      logic-not-delete-value: 0

spring:
  application:
    name: security
  datasource:
    username: root
    password: mysqlroot
    url: jdbc:mysql://192.168.100.100:3306/security?useUnicode=true&characterEncoding=utf-8&serverTimezone=GMT%2B8
    driver-class-name: com.mysql.cj.jdbc.Driver
生成代码
配置代码生成器
配置MyBatis Plus的代码生成器,它能够自动生成Mapper、Entity等MyBatis所需的文件,简化开发流程。
查看代码
public class CodeGenerator {
    public static void main(String[] args) {
        FastAutoGenerator.create("jdbc:mysql://192.168.100.100:3306/security?useUnicode=true&characterEncoding=utf-8&serverTimezone=GMT%2B8",
                "root", "mysqlroot")
            .globalConfig(builder -> {
                builder.author("cengxuyuan")
                    .outputDir(System.getProperty("user.dir") + "/src/main/java");
            })
            .packageConfig(builder -> {
                builder.parent("com.cengxuyuan.security")
                    .pathInfo(Collections.singletonMap(OutputFile.entity, System.getProperty("user.dir") + "/src/main/java/com/cengxuyuan/security/entity"));
            })
            .strategyConfig(builder -> {
                builder.addInclude(scanner("表名,多个英文逗号分割").split(","))
                    .addTablePrefix("t_")
                    .entityBuilder()
                    .enableLombok()


                    .naming(NamingStrategy.underline_to_camel);
                builder.controllerBuilder()
                    .enableRestStyle();
                builder.mapperBuilder()
                    .enableMapperAnnotation();
                builder.serviceBuilder()
                    .formatServiceFileName("%sService")
                    .formatServiceImplFileName("%sServiceImpl");
            })
            .execute();
    }

    public static String scanner(String tip) {
        Scanner scanner = new Scanner(System.in);
        StringBuilder help = new StringBuilder();
        help.append("请输入" + tip + ":");
        System.out.println(help);
        if (scanner.hasNext()) {
            String ipt = scanner.next();
            if (StringUtils.isNotBlank(ipt)) {
                return ipt;
            }
        }
        throw new MybatisPlusException("请输入正确的" + tip + "!");
    }
}
生成代码
运行上面的main方法,输入需要生成相关代码的表名。
t_user,t_role,t_permission,t_user_role,t_role_permission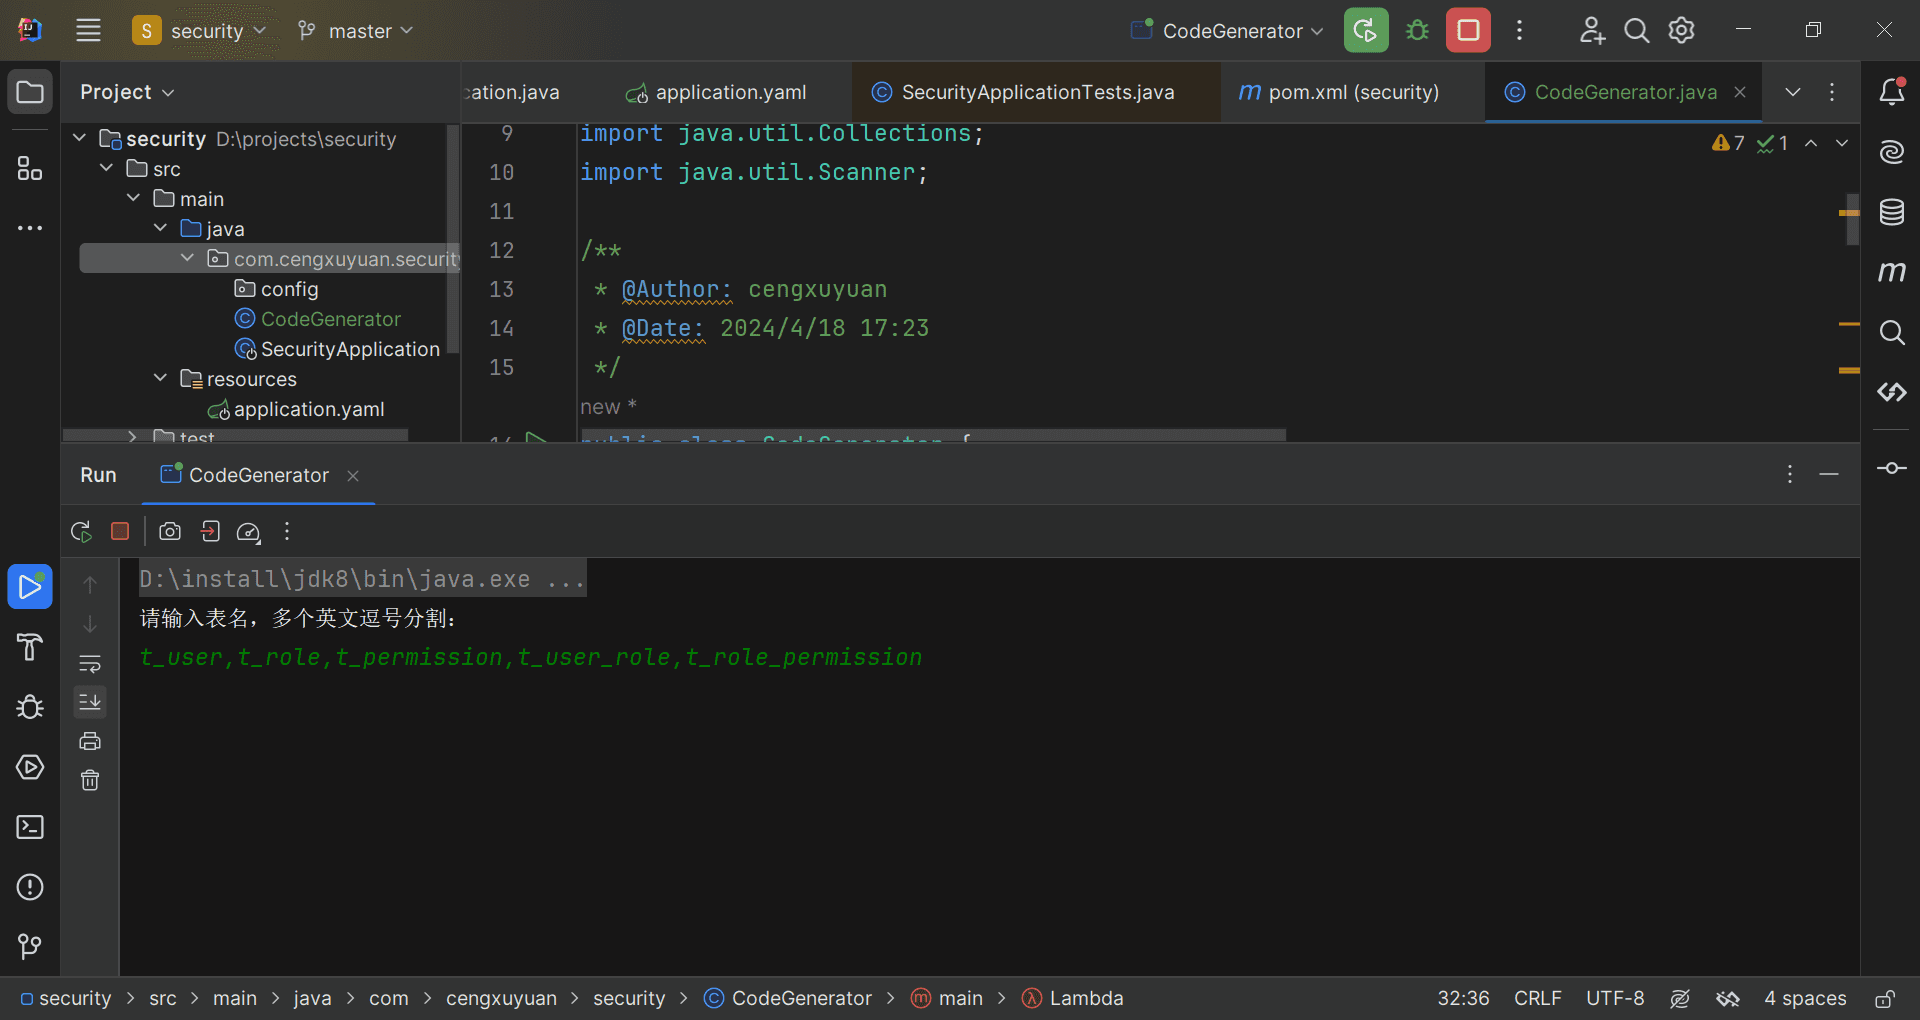
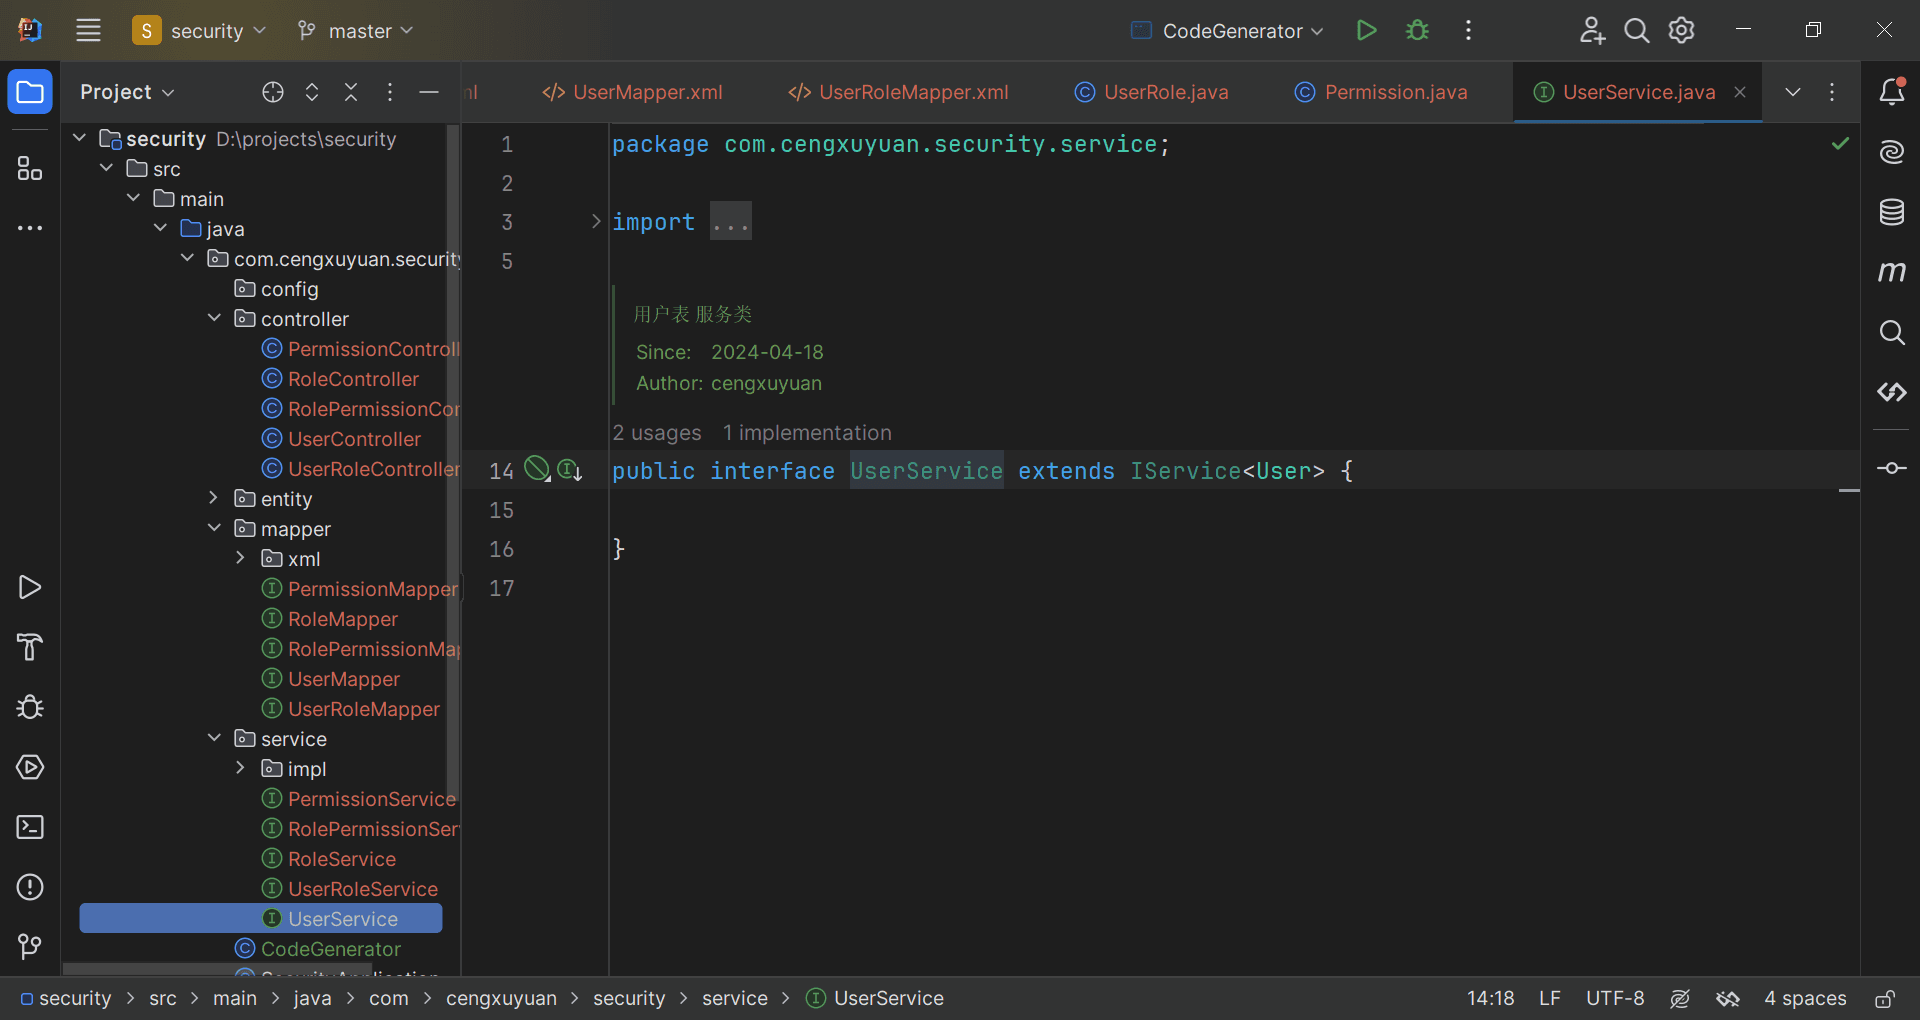
每张表都会生成entity、mapper、service、controller等代码。
添加配置类
写一个mybatis-plus的自动插入的配置类,更新时间和创建时间不需要我们手动new,可以自动填充,同时加一个分页拦截器,可有可无。
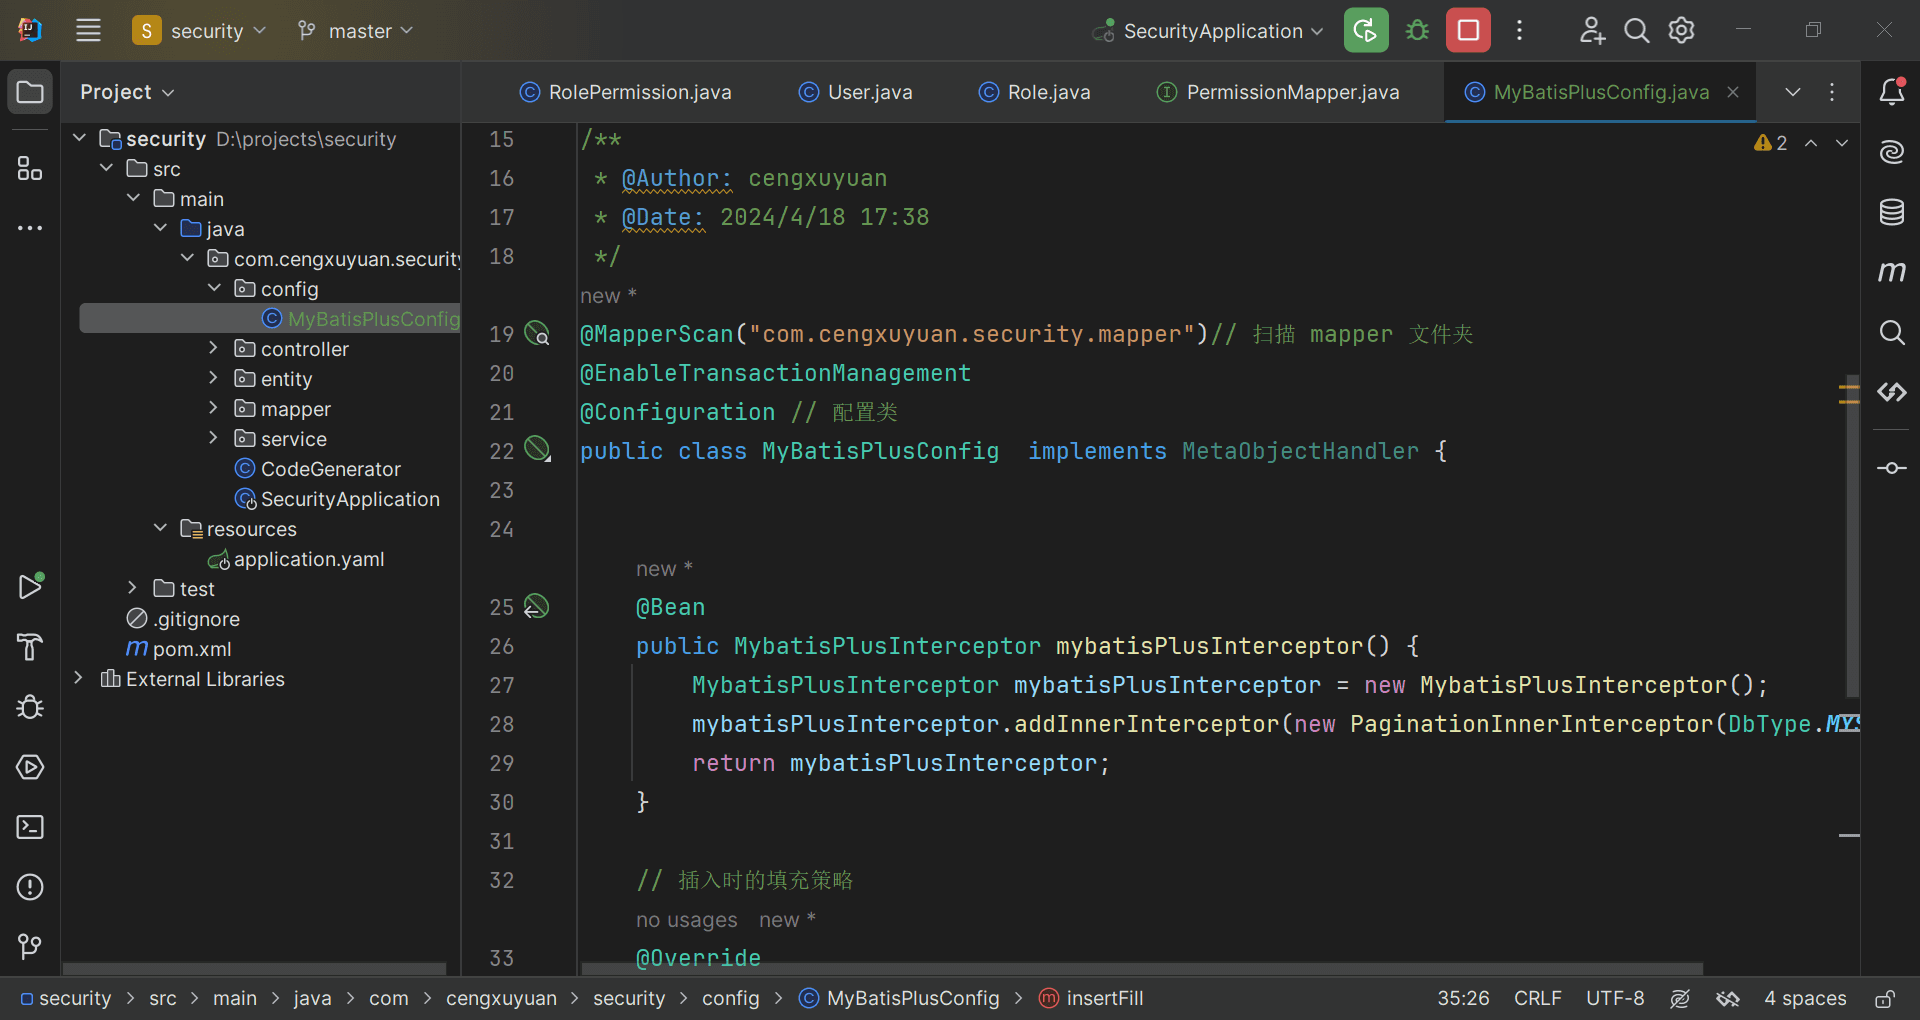
查看代码
@MapperScan("com.cengxuyuan.security.mapper")// 扫描 mapper 文件夹
@EnableTransactionManagement
@Configuration // 配置类
public class MyBatisPlusConfig  implements MetaObjectHandler {


    @Bean
    public MybatisPlusInterceptor mybatisPlusInterceptor() {
        MybatisPlusInterceptor mybatisPlusInterceptor = new MybatisPlusInterceptor();
        mybatisPlusInterceptor.addInnerInterceptor(new PaginationInnerInterceptor(DbType.MYSQL));
        return mybatisPlusInterceptor;
    }

    // 插入时的填充策略
    @Override
    public void insertFill(MetaObject metaObject) {
        this.setFieldValByName("createTime", new Date(), metaObject);
        this.setFieldValByName("updateTime", new Date(), metaObject);
    }

    // 更新时的填充策略
    @Override
    public void updateFill(MetaObject metaObject) {
        this.setFieldValByName("updateTime", new Date(), metaObject);
    }
}
添加redis
添加redis和fastjson依赖
<dependency>
    <groupId>org.springframework.boot</groupId>
    <artifactId>spring-boot-starter-data-redis</artifactId>
</dependency>
<dependency>
    <groupId>com.alibaba</groupId>
    <artifactId>fastjson</artifactId>
    <version>1.2.47</version>
</dependency>
配置redis
  redis:
    host: 192.168.100.100
    port: 6379
    password: redisroot
    database: 8
配置类
主要配置了redis的键值序列化方式。
查看代码
@Configuration
public class RedisConfig {
    @Bean
    public RedisTemplate<String, Object> redisTemplate(RedisConnectionFactory redisConnectionFactory){
        Jackson2JsonRedisSerializer<Object> jackson2JsonRedisSerializer = new Jackson2JsonRedisSerializer<>(Object.class);
        ObjectMapper objectMapper = new ObjectMapper();
        objectMapper.setVisibility(PropertyAccessor.ALL, JsonAutoDetect.Visibility.ANY);
        objectMapper.enableDefaultTyping(ObjectMapper.DefaultTyping.NON_FINAL);
        jackson2JsonRedisSerializer.setObjectMapper(objectMapper);

        RedisTemplate<String, Object> redisTemplate = new RedisTemplate<>();
        redisTemplate.setConnectionFactory(redisConnectionFactory);
        redisTemplate.setKeySerializer(new StringRedisSerializer());
        redisTemplate.setValueSerializer(jackson2JsonRedisSerializer);
        redisTemplate.setHashKeySerializer(jackson2JsonRedisSerializer);
        redisTemplate.setHashValueSerializer(jackson2JsonRedisSerializer);
        return redisTemplate;
    }
}
配置security
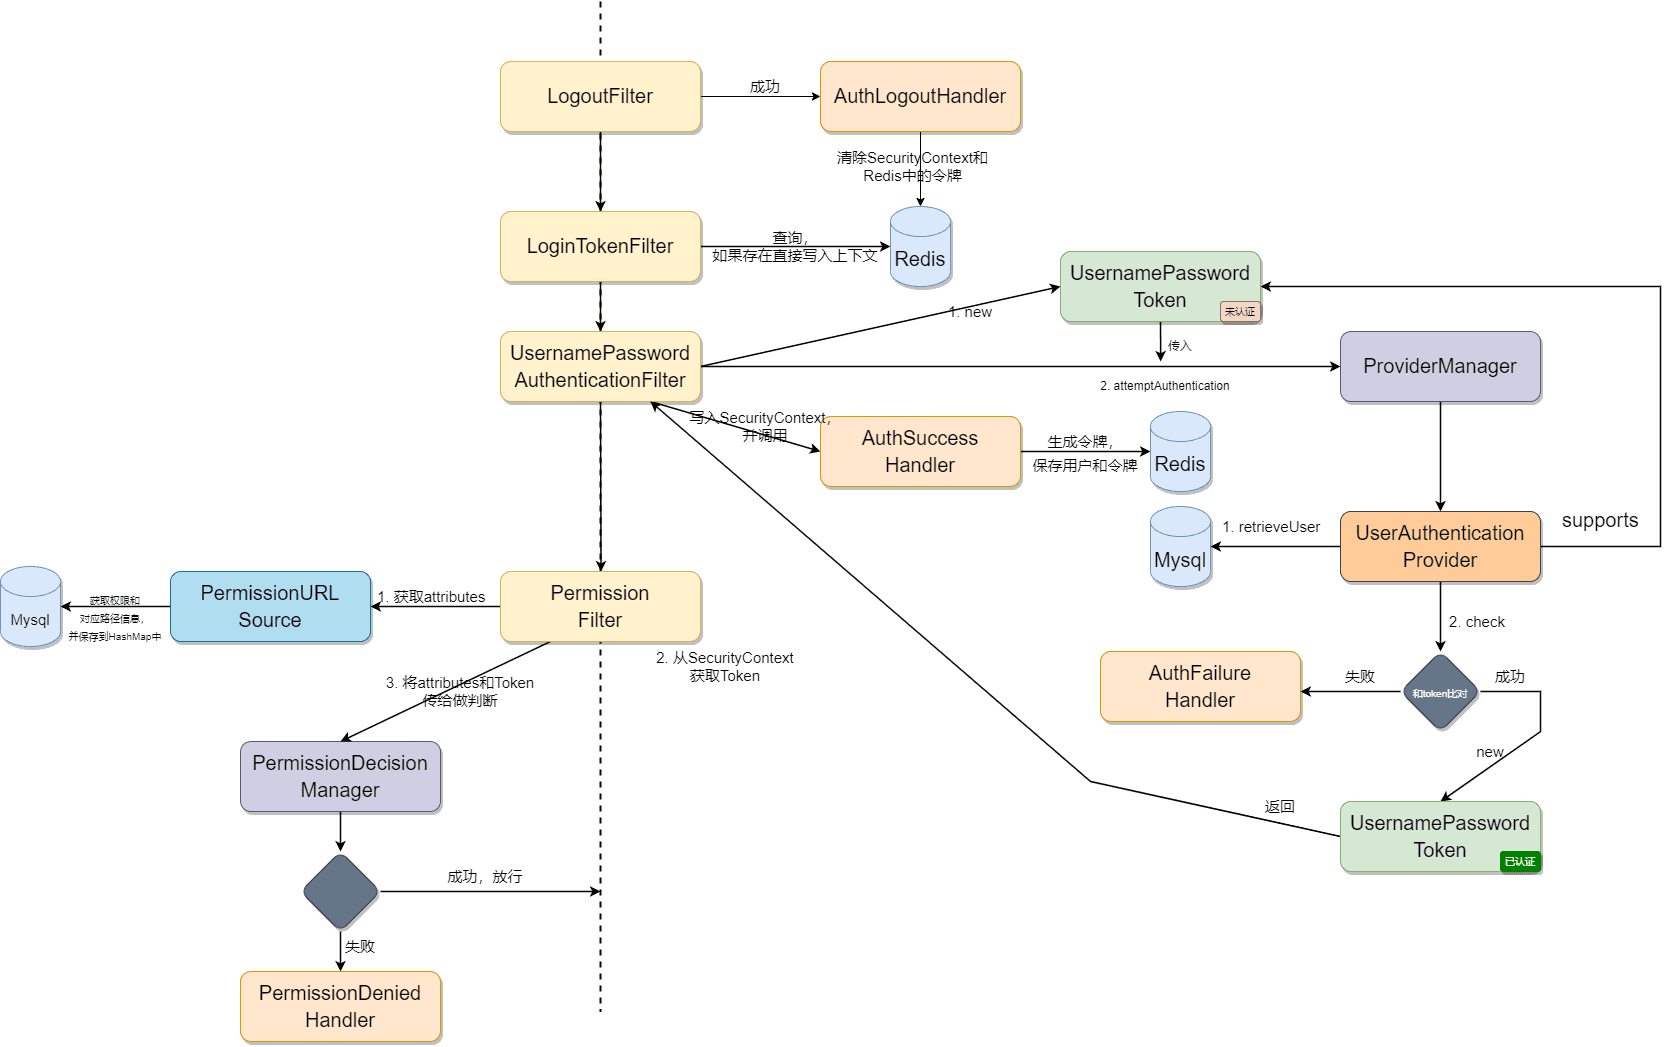
设置@EnableWebSecurity(debug = true),启用Web安全并允许输出调试信息以看到调用的过滤器链。在configure方法中,禁用跨域资源共享(CORS)和跨站请求伪造(CSRF)的保护,主打前后端分离,使用token持久化认证记录。最后,暴露AuthenticationManager,交给spring容器管理,让后面可以调用。
查看代码
@EnableWebSecurity(debug = true)
@Configuration
public class SecurityConfig extends WebSecurityConfigurerAdapter {

    protected void configure(HttpSecurity http) throws Exception {
        http.cors().disable()
            .csrf().disable();
    }

    @Override
    @Bean
    public AuthenticationManager authenticationManagerBean() throws Exception {
        return super.authenticationManagerBean();
    }

}
实现认证
自定义认证token
自定义认证UsernamePasswordAuthenticationToken,用于在认证过程中封装用户名和密码这类登录凭证。
这个token扩展了AbstractAuthenticationToken类,该类是所有认证令牌的基类,有一个authenticated布尔属性,表示是否已经认证。
在用户登录时,我们就根据用户名和密码来new一个UsernamePasswordAuthenticationToken对象,
这个类有两个构造函数,一个仅接受用户名和密码,自动设置authenticated为false,用于在用户还未被认证时创建token,登录时使用的就是这个,因为还没认证;
另一个接受用户名、密码和一个授予权限的集合,自动设置authenticated为true,用于在用户已经被认证时创建token,后面如果用户已经登录了就会保存登录信息到redis中,根据redis的信息构建认证过的token。
查看代码
public class UsernamePasswordAuthenticationToken extends AbstractAuthenticationToken {
    private static final long serialVersionUID = 520L;
    private final Object principal;
    private Object credentials;

    public UsernamePasswordAuthenticationToken(Object principal, Object credentials) {
        super((Collection)null);
        this.principal = principal;
        this.credentials = credentials;
        this.setAuthenticated(false);
    }

    public UsernamePasswordAuthenticationToken(Object principal, Object credentials, Collection<? extends GrantedAuthority> authorities) {
        super(authorities);
        this.principal = principal;
        this.credentials = credentials;
        super.setAuthenticated(true);
    }

    public Object getCredentials() {
        return this.credentials;
    }

    public Object getPrincipal() {
        return this.principal;
    }

    public void setAuthenticated(boolean isAuthenticated) throws IllegalArgumentException {
        if (isAuthenticated) {
            throw new IllegalArgumentException("Cannot set this token to trusted - use constructor which takes a GrantedAuthority list instead");
        } else {
            super.setAuthenticated(false);
        }
    }

    public void eraseCredentials() {
        super.eraseCredentials();
        this.credentials = null;
    }
}
定义认证token的provider
定义mapper层
根据登陆时传入的用户名查询用户信息。
@Mapper
public interface UserMapper extends BaseMapper<User> {
    @Select("select * from t_user where USER_NAME=#{username} and IS_DELETE=#{delete}")
    User findByUsernameAndDelete(@Param("username") String username, @Param("delete") boolean delete);
}
根据查询到的用户ID到关系表中查询用户的角色信息。
查看代码
@Mapper
public interface UserRoleMapper extends BaseMapper<UserRole> {

    @Select("select r.role_id, r.role_name " +
        "FROM t_user_role ur " +
        "JOIN t_role r ON ur.role_id = r.role_id " +
        "WHERE ur.user_id = #{userId}")
    List<Role> findRoleByUserId(@Param("userId") String userId);

}
自定义provider
有了上面的数据库访问接口,可以实现下面的认证过程。
这个UserAuthenticationProvider类接收一个Authentication对象,也就是上面说到的认证token。
通过重写supports方法,让这个provider支持给我们的自定义token提供认证服务。
认证过程主要在authenticate方法中,首先会尝试从缓存(Redis)中获取用户信息,如果缓存中没有或者缓存的信息不正确,则会调用retrieveUser方法从数据库中加载用户信息。然后,通过additionalAuthenticationChecks方法对用户提供的密码进行校验。
如果认证成功,就传入3个参数new一个已认证的token对象返回。如果认证失败,就抛出异常了,等待外面的认证失败处理器处理。
注意这里为了方便,没有使用密码加密器。
查看代码
@Component
public class UserAuthenticationProvider implements AuthenticationProvider {

    @Autowired
    private PasswordEncoder passwordEncoder;
    @Autowired
    private UserMapper userMapper;
    @Autowired
    private UserRoleMapper userRoleMapper;
    @Autowired
    RedisTemplate redisTemplate;
    private GrantedAuthoritiesMapper authoritiesMapper = new NullAuthoritiesMapper();

    public UserAuthenticationProvider() {
    }

    @Override
    public Authentication authenticate(Authentication authentication) throws AuthenticationException {
        String username = authentication.getPrincipal() == null ? "NONE_PROVIDED" : authentication.getName();
        Object jsonUserObj = redisTemplate.opsForValue().get("login:cache:" + username);
        String jsonUser = null;
        if (jsonUserObj instanceof JSONObject) {
            JSONObject jsonObject = (JSONObject) jsonUserObj;
            jsonUser = jsonObject.toJSONString();
        }
        boolean cacheWasUsed = true;
        UserDetails user;
        if (jsonUser == null) {
            cacheWasUsed = false;
            user = this.retrieveUser(username);
        } else {
            JSONArray authoritiesJSON = ((JSONObject) jsonUserObj).getJSONArray("authorities");
            Set<GrantedAuthority> authorities = authoritiesJSON.stream()
                    .map(
                            authorityObj -> new SimpleGrantedAuthority(((JSONObject) authorityObj).getString("authority"))
                    ).collect(Collectors.toSet());
            user = JSON.parseObject(jsonUser, User.class);
            user = new User(user.getUsername(), user.getPassword(), authorities);
        }
        try {
            this.additionalAuthenticationChecks(user, (UsernamePasswordAuthenticationToken) authentication);
        } catch (AuthenticationException ex) {
            if (!cacheWasUsed) {
                throw ex;
            }
            cacheWasUsed = false;
            user = this.retrieveUser(username);
            this.additionalAuthenticationChecks(user, (UsernamePasswordAuthenticationToken) authentication);
        }
        if (!cacheWasUsed) {
            redisTemplate.opsForValue().set("login:cache:" + username, JSON.toJSON(user), 5, TimeUnit.MINUTES);
        }
        Object principalToReturn = user;

        return this.createSuccessAuthentication(principalToReturn, authentication, user);
    }

    @Override
    public boolean supports(Class<?> authentication) {
        return UsernamePasswordAuthenticationToken.class.isAssignableFrom(authentication);
    }

    protected final UserDetails retrieveUser(String username) throws AuthenticationException {
        try {
            com.cengxuyuan.security.entity.User loadedUser = userMapper.findByUsernameAndDelete(username, false);
            if (loadedUser == null) {
                throw new InternalAuthenticationServiceException("用户不存在");
            }
            List<Role> roles = userRoleMapper.findRoleByUserId(loadedUser.getUserId());
            Set<GrantedAuthority> authorities = roles.stream()
                    .map(role -> new SimpleGrantedAuthority(role.getRoleName()))
                    .collect(Collectors.toSet());

            User userDetails = new User(loadedUser.getUserName(), loadedUser.getPassword(), authorities);

            if (userDetails == null) {
                throw new InternalAuthenticationServiceException("UserDetailsService returned null");
            } else {
                return userDetails;
            }
        } catch (InternalAuthenticationServiceException var5) {
            throw var5;
        } catch (Exception var6) {
            throw new InternalAuthenticationServiceException(var6.getMessage(), var6);
        }
    }

    protected void additionalAuthenticationChecks(UserDetails userDetails, UsernamePasswordAuthenticationToken authentication) throws AuthenticationException {
        if (authentication.getCredentials() == null) {
            throw new BadCredentialsException("未输入密码");
        } else {
            String presentedPassword = authentication.getCredentials().toString();
            if (!presentedPassword.equals(userDetails.getPassword())) {
                throw new BadCredentialsException("账号名或密码错误");
            }
        }
    }

    protected Authentication createSuccessAuthentication(Object principal, Authentication authentication, UserDetails user) {
        boolean upgradeEncoding = false;
        if (upgradeEncoding) {
            String presentedPassword = authentication.getCredentials().toString();
            String newPassword = this.passwordEncoder.encode(presentedPassword);
            user = new User(user.getUsername(), newPassword, user.getAuthorities());
        }
        UsernamePasswordAuthenticationToken result = new UsernamePasswordAuthenticationToken(principal, authentication.getCredentials(), this.authoritiesMapper.mapAuthorities(user.getAuthorities()));
        result.setDetails(authentication.getDetails());
        return result;
    }
}
定义登录过滤器
过滤器是最先接触请求的,只有符合登录条件("/login", "POST")的请求才会被拦截,其余的请求交给下一个过滤器chain.doFilter(request, response)。
符合登录条件的请求会执行这个过滤器的逻辑,先从请求体中获取用户名和密码,使用这2个参数new一个未认证的自定义token,然后将这个token交给一个Manager,Manager负责其余的认证过程,如果认证成功就会返回一个认证成功的token,然后将这个token保存到SecurityContext线程上下文中,然后执行登录成功处理器的逻辑,请求结束。
如果认证失败,会抛出异常,在过滤器中捕获到相关的异常,就会执行登录失败处理器的逻辑,如果不相关的异常,就继续抛出,最后执行默认的认证失败处理器的逻辑。
查看代码
public class UsernamePasswordAuthenticationFilter extends AbstractAuthenticationProcessingFilter {
    private String usernameParameter = "username";
    private String passwordParameter = "password";
    private boolean postOnly = true;

    public UsernamePasswordAuthenticationFilter() {
        super(new AntPathRequestMatcher("/login", "POST"));
    }

    public void doFilter(ServletRequest req, ServletResponse res, FilterChain chain) throws IOException, ServletException {
        HttpServletRequest request = (HttpServletRequest) req;
        HttpServletResponse response = (HttpServletResponse) res;
        if (!this.requiresAuthentication(request, response)) {
            chain.doFilter(request, response);
        } else if (request.getContentType().equals(MediaType.APPLICATION_JSON_VALUE)) {
            if (this.logger.isDebugEnabled()) {
                this.logger.debug("Request is to process authentication");
            }

            Authentication authResult;
            try {
                authResult = this.attemptAuthentication(request, response);
                if (authResult == null) {
                    return;
                }
            } catch (InternalAuthenticationServiceException var8) {
                this.logger.error("An internal error occurred while trying to authenticate the user.", var8);
                this.unsuccessfulAuthentication(request, response, var8);
                return;
            } catch (AuthenticationException var9) {
                this.unsuccessfulAuthentication(request, response, var9);
                return;
            }
            // 认证成功,写入上下文,并调用成功handler
            this.successfulAuthentication(request, response, chain, authResult);
        }
    }

    public Authentication attemptAuthentication(HttpServletRequest request, HttpServletResponse response) throws AuthenticationException {
        if (this.postOnly && !request.getMethod().equals("POST")) {
            throw new AuthenticationServiceException("Authentication method not supported: " + request.getMethod());
        } else {
            // 使用fastjson解析JSON请求体
            StringBuilder sb = new StringBuilder();
            try (BufferedReader reader = request.getReader()) {
                String line;
                while ((line = reader.readLine()) != null) {
                    sb.append(line);
                }
            } catch (IOException e) {
                throw new RuntimeException("Error reading JSON string", e);
            }

            // 将JSON字符串转换为JSONObject
            JSONObject json = JSON.parseObject(sb.toString());

            // 从JSON中获取用户名和密码
            String username = json.getString(getUsernameParameter());
            String password = json.getString(getPasswordParameter());

            if (username == null) {
                username = "";
            }
            if (password == null) {
                password = "";
            }
            username = username.trim();
            // 根据用户名密码新建一个还未认证的AuthenticationToken
            UsernamePasswordAuthenticationToken authRequest = new UsernamePasswordAuthenticationToken(username, password);
            // 设置细节:sessionID和remoteURL
            this.setDetails(request, authRequest);
            // 传给manager让它找一个可以给这个token认证的provider, 如果认证成功了就返回成功认证的AuthenticationToken
            return this.getAuthenticationManager().authenticate(authRequest);
        }
    }

    protected void setDetails(HttpServletRequest request, UsernamePasswordAuthenticationToken authRequest) {
        authRequest.setDetails(this.authenticationDetailsSource.buildDetails(request));
    }

    public final String getUsernameParameter() {
        return this.usernameParameter;
    }

    public final String getPasswordParameter() {
        return this.passwordParameter;
    }
}
定义登录处理器
为filter实现登录成功处理器
当用户在过滤器中成功通过认证时,会调用过滤器指定的AuthenticationSuccessHandler的onAuthenticationSuccess方法。
我们自定义AuthSuccessHandler登录成功处理器,重写onAuthenticationSuccess方法。
在这个方法中,首先从认证对象中获取用户信息(不包含敏感信息),然后生成一个UUID作为token,并将这个token以及用户信息存入Redis缓存中,设置一个过期时间(例如5分钟)。接着,创建一个包含用户信息和token的Map,将其转换为JSON格式的字符串,并作为HTTP响应返回给客户端。这样,客户端就可以接收到这个token,并在后续的请求中使用它来进行身份验证。
查看代码
@Component
public class AuthSuccessHandler implements AuthenticationSuccessHandler {

    @Autowired
    RedisTemplate redisTemplate;

    @Override
    public void onAuthenticationSuccess(HttpServletRequest httpServletRequest, HttpServletResponse httpServletResponse, Authentication authentication) throws IOException, ServletException {
        User user = (User) authentication.getPrincipal();
        String token = UUID.randomUUID().toString().replace("-", "");
        redisTemplate.opsForValue().set("login:token:" + token,
            JSON.toJSONString(user), 5, TimeUnit.MINUTES);
        // 创建一个Map来包含额外的键值对
        Map<String, Object> responseMap = new HashMap<>();
        responseMap.put("user", user);
        responseMap.put("token", token); // 添加token到Map中
        httpServletResponse.setCharacterEncoding("utf-8");
        httpServletResponse.setContentType("application/json");
        String jsonString = JSON.toJSONString(Result.success(responseMap));
        httpServletResponse.getWriter().println(jsonString);
        httpServletResponse.getWriter().flush();
    }
}
为filter实现失败处理器
当用户在登录过滤器中捕获到相关异常时,会调用过滤器指定的AuthenticationFailureHandler的onAuthenticationFailure方法。
我们自定义AuthFailureHandler登录失败处理器,重写onAuthenticationFailure方法。
在这个方法中,我们返回json格式的异常信息。
查看代码
@Component
public class AuthFailureHandler implements AuthenticationFailureHandler {
    @Override
    public void onAuthenticationFailure(HttpServletRequest httpServletRequest, HttpServletResponse httpServletResponse, AuthenticationException e) throws IOException, ServletException {
        // 捕获了认证失败的异常
        // 返回失败信息
        httpServletResponse.setCharacterEncoding("utf-8");
        httpServletResponse.setContentType("application/json");
        String jsonString = JSON.toJSONString(Result.fail(e.getMessage()));
        httpServletResponse.getWriter().println(jsonString);
        httpServletResponse.getWriter().flush();
    }
}
token登录过滤器
如何利用登录时保存到redis中的token进行自动识别登录呢?
我们再创建一个过滤器,用来判断请求头是否携带token,如果携带就到redis中去查出相应的认证token,保存到认证上下文中,这样就实现了登录状态的保持。
查看代码
@Component
public class LoginTokenFilter extends OncePerRequestFilter {
    @Autowired
    RedisTemplate redisTemplate;

    @Override
    protected void doFilterInternal(HttpServletRequest httpServletRequest, HttpServletResponse httpServletResponse, FilterChain filterChain) throws ServletException, IOException {
        String token = httpServletRequest.getHeader("token");
        if (token == null) {
            token = "";
        }
        String object = (String) redisTemplate.opsForValue().get("login:token:" + token);
        if (object != null) {
//            JSONObject jsonObject = (JSONObject) object;
            User user = JSON.parseObject(object, User.class);
            UsernamePasswordAuthenticationToken authenticationToken =
                new UsernamePasswordAuthenticationToken(
                    user.getUsername(), user.getPassword(), user.getAuthorities());
            SecurityContextHolder.getContext().setAuthentication(authenticationToken);
        } else {
            SecurityContextHolder.clearContext();
        }
        filterChain.doFilter(httpServletRequest, httpServletResponse);
    }
}
配置security
上面我们只是实现了认证相关的组件,SpringSecurity并没有识别并使用它们。
这需要我们在SecurityConfig中进行配置。
注入所有相关组件,交给spring容器管理。
注意登录过滤器需要指定我们自定义的登录成功失败处理器,还需要指定之前暴露出来的Manager,这样过滤器才能将token交给Manager进行认证。
查看代码
@EnableWebSecurity(debug = true)
@Configuration
public class SecurityConfig extends WebSecurityConfigurerAdapter {

    @Autowired
    AuthSuccessHandler authSuccessHandler;
    @Autowired
    AuthFailureHandler authFailureHandler;

    @Autowired
    AuthenticationEntryPointIHandler authenticationEntryPointIHandler;
    @Autowired
    AuthLogoutHandler authLogoutHandler;
    @Autowired
    LoginTokenFilter loginTokenFilter;

    @Bean
    public PasswordEncoder passwordEncoder() {
        return new BCryptPasswordEncoder();
    }

    @Bean
    public UsernamePasswordAuthenticationFilter loginFilter() throws Exception {
        UsernamePasswordAuthenticationFilter filter = new UsernamePasswordAuthenticationFilter();
        filter.setAuthenticationSuccessHandler(authSuccessHandler);
        filter.setAuthenticationFailureHandler(authFailureHandler);
        filter.setAuthenticationManager(authenticationManagerBean());
        return filter;
    }

    protected void configure(HttpSecurity http) throws Exception {
        http.cors().disable()
            .csrf().disable()
            .sessionManagement().disable()
            .authorizeRequests(auth -> auth
                .antMatchers("/login"
                ).permitAll()
                .anyRequest().authenticated()
            )
            .logout().permitAll().logoutUrl("/logout").addLogoutHandler(authLogoutHandler)
            .and()
            .addFilterAt(loginFilter(), org.springframework.security.web.authentication.UsernamePasswordAuthenticationFilter.class)
            .addFilterBefore(loginTokenFilter, LogoutFilter.class)
            .exceptionHandling(ex ->
                ex.authenticationEntryPoint(authenticationEntryPointIHandler))
        ;
    }


    @Override
    @Bean
    public AuthenticationManager authenticationManagerBean() throws Exception {
        return super.authenticationManagerBean();
    }


}
实现上面配置的处理器
上面的security配置中,还使用了其他的处理器,下面进行实现。
默认的认证失败处理器
如果抛出的认证异常没被其他处理器处理,就会执行默认的认证失败处理器,我们把执行逻辑修改为和登录失败处理器一样。
查看代码
@Component
public class AuthenticationEntryPointIHandler implements AuthenticationEntryPoint {

    @Override
    public void commence(HttpServletRequest httpServletRequest, HttpServletResponse httpServletResponse, AuthenticationException e) throws IOException, ServletException {
        httpServletResponse.setCharacterEncoding("UTF-8");
        httpServletResponse.setContentType("application/json");
        String jsonString = JSON.toJSONString(Result.fail(e.getMessage()));
        httpServletResponse.getWriter().println(jsonString);
        httpServletResponse.getWriter().flush();
    }
}
登出处理器
在配置中,我们指定了登出的请求路径,并允许所有的请求访问登出路径,还添加了一个自定义的登出处理器,它是加到原有的登出处理器上的,因此原有的处理器都会执行。
我们需要在登出时做一些额外的处理,就是清除redis中的持久化登录token。
查看代码
@Component
public class AuthLogoutHandler implements LogoutHandler {
    @Autowired
    RedisTemplate redisTemplate;

    @Override
    public void logout(HttpServletRequest httpServletRequest, HttpServletResponse httpServletResponse, Authentication authentication) {
        String token = httpServletRequest.getHeader("token");
        if (token == null) {
            token = "NONE_PROVIDED";
        }
        Boolean delete = redisTemplate.delete("login:token:" + token);
        String jsonString = JSON.toJSONString(Result.success("退出登录成功"));
        if (!delete) {
            jsonString = JSON.toJSONString(Result.fail("退出登录失败"));
        }
        SecurityContextHolder.clearContext();
        httpServletResponse.setCharacterEncoding("utf-8");
        httpServletResponse.setContentType("application/json");
        try {
            httpServletResponse.getWriter().println(jsonString);
            httpServletResponse.getWriter().flush();
        } catch (IOException e) {
            throw new RuntimeException(e);
        }
    }
}
测试
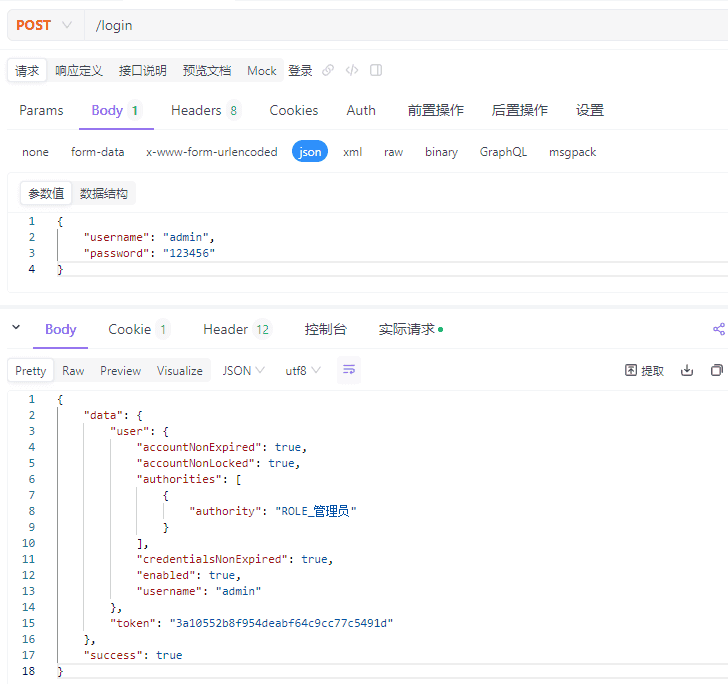
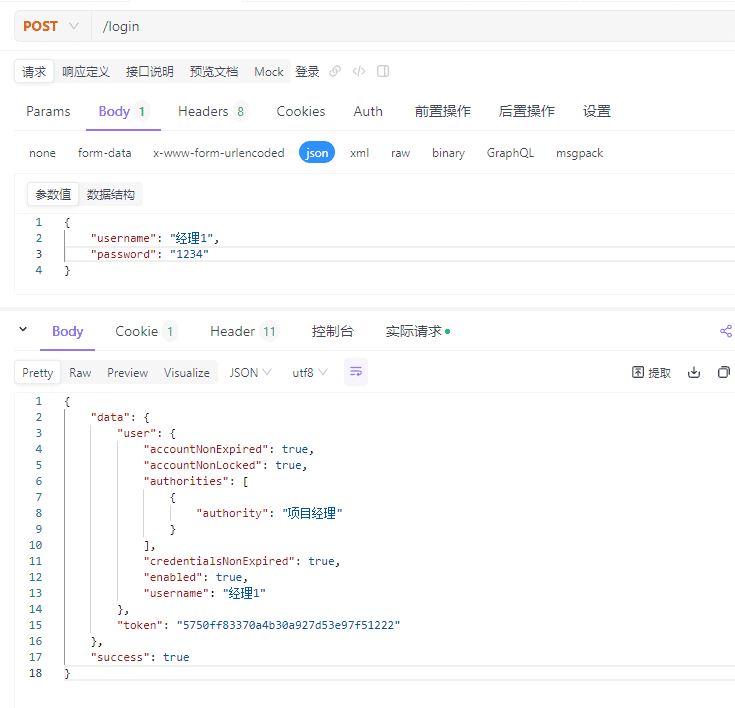
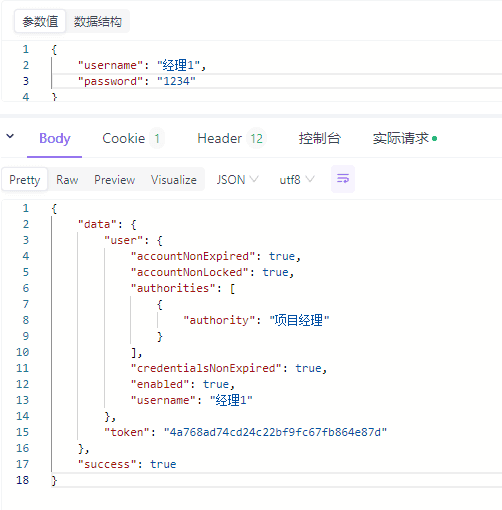
使用管理员的账号和密码进行登录,编写json格式的数据后POST /login。返回的数据中有用户的权限信息和一个持久化认证的token。下次请求携带token就能识别该请求的用户了。
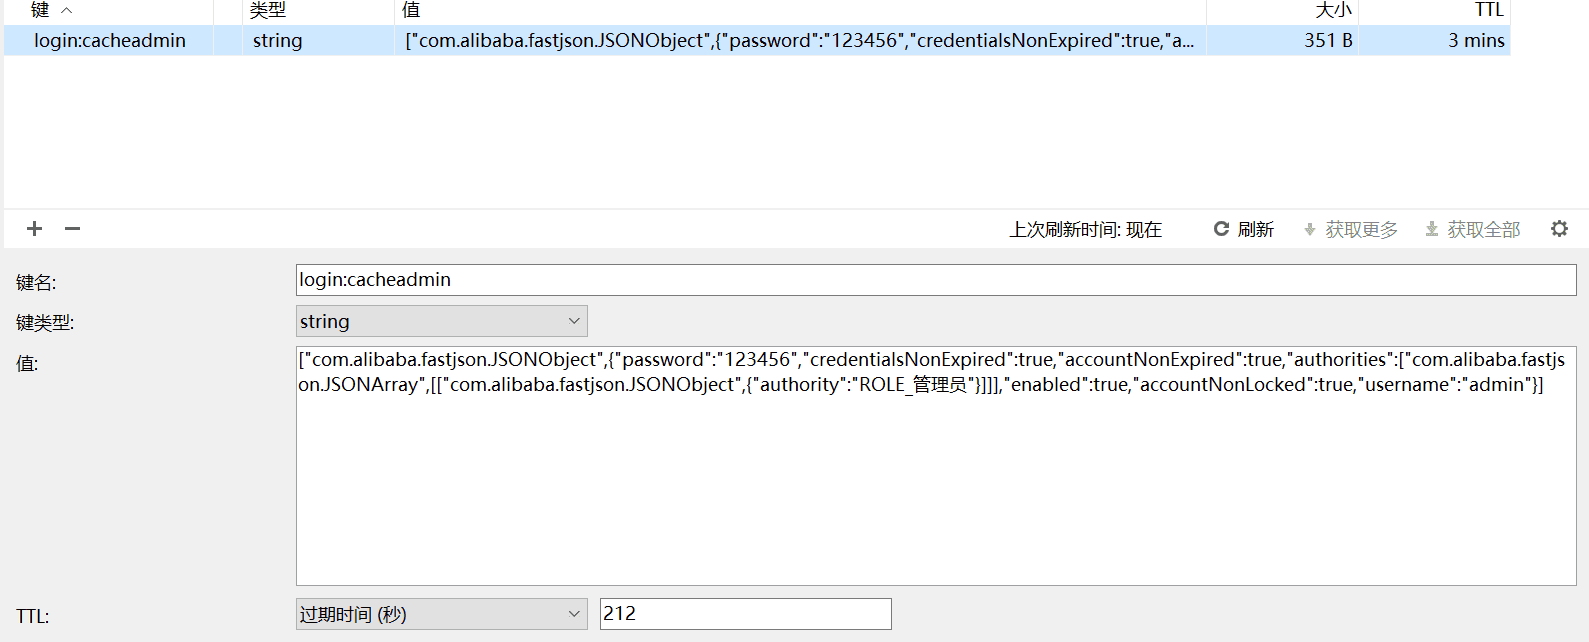
在redis数据库中存在下面两条数据,第一条是数据库查询用户的缓存,是用来减轻Mysql压力、优化查询效率的,第二条就是登录持久化的认证信息,根据用户传来的token进行查询。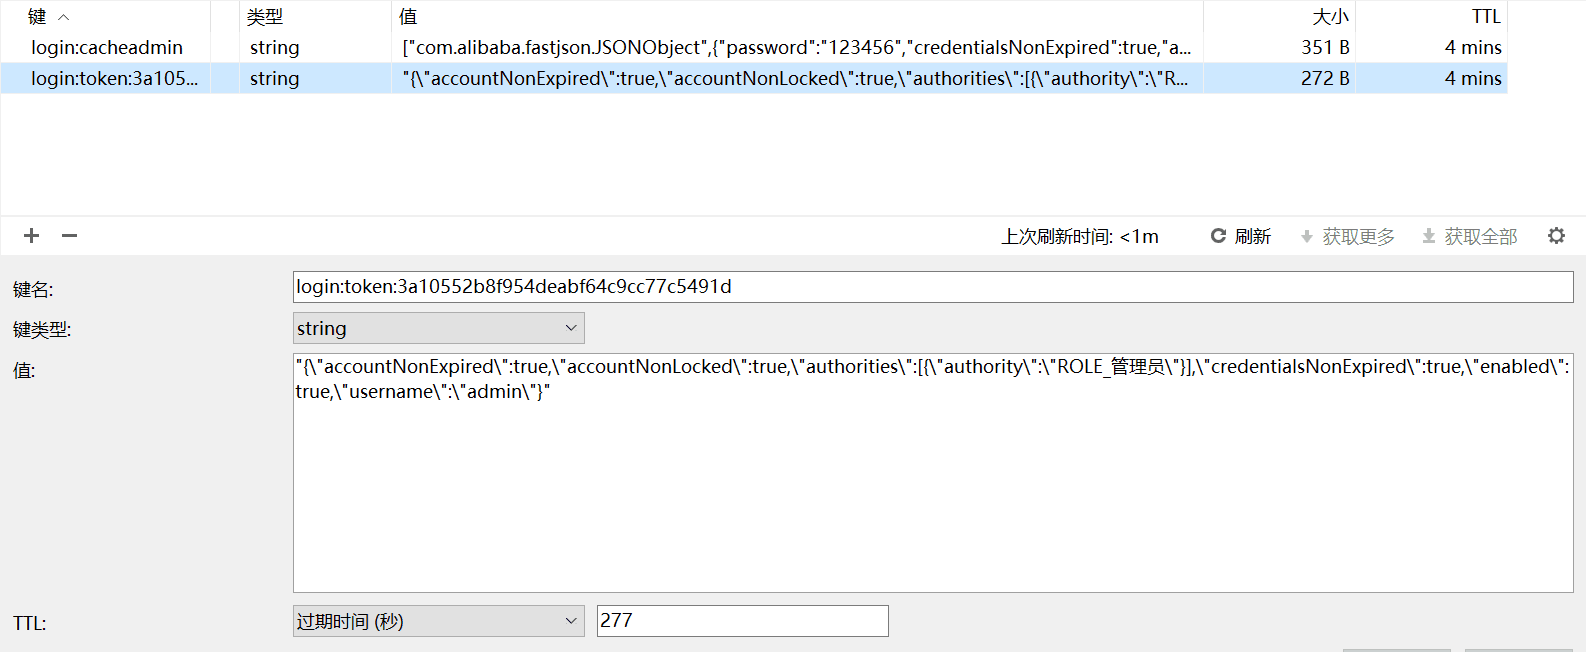
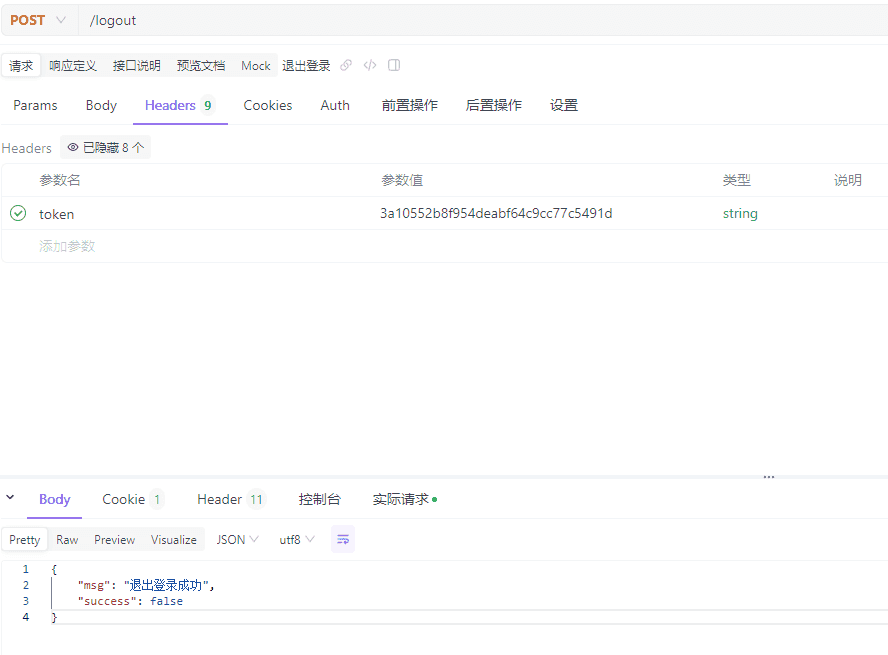
携带token发送退出登录请求,返回退出登陆成功的提示信息。
实现授权
security使用注解可以方便的实现权限的功能,但是这样动态修改就会变得困难。
因此我们把权限控制信息保存到数据库中,这样可以实现更精细的控制和更方便的修改。
修改权限表
原本的权限表没有为权限指定特定的权限资源。现在我们增加'权限路径'的字段,为每个权限指定特定的访问路径。
增加字段
ALTER TABLE t_permission
ADD COLUMN permission_path VARCHAR(100) NOT NULL COMMENT '权限路径' AFTER permission_name;
手动增加数据
数据格式为请求方法+冒号+请求路径。
请求路径可以使用*号,如/setting/**。

请求方法有如下几种,如果为ALL,我们做特殊判断,表示允许所有请求方法。
代码生成
开启 MyBatis-Plus 代码生成器的文件覆盖功能,在策略配置中设置实体类的 FileOverride 。
            .strategyConfig(builder -> {
                builder.addInclude(scanner("表名,多个英文逗号分割").split(","))
                    .addTablePrefix("t_")
                    .entityBuilder()
                    .enableLombok()
                    .enableFileOverride()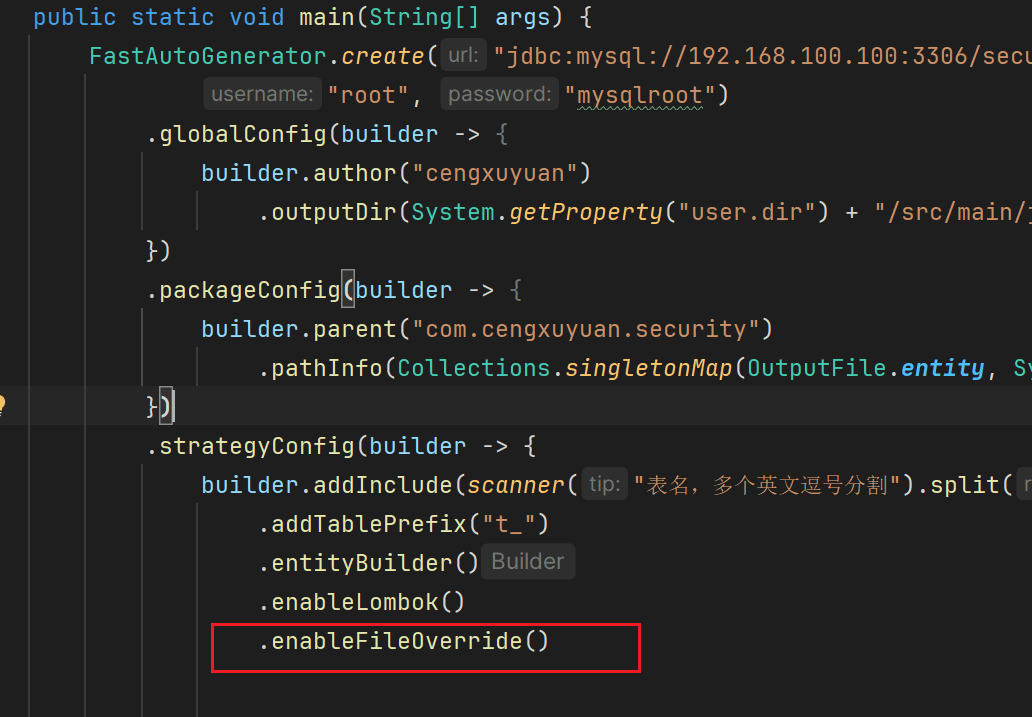
重新生成t_permission表的代码。

生成后,有变化的就是Permission实体类增加了字段。
/**
 * 权限路径
 */
private String permissionPath;
编写授权的测试接口实现
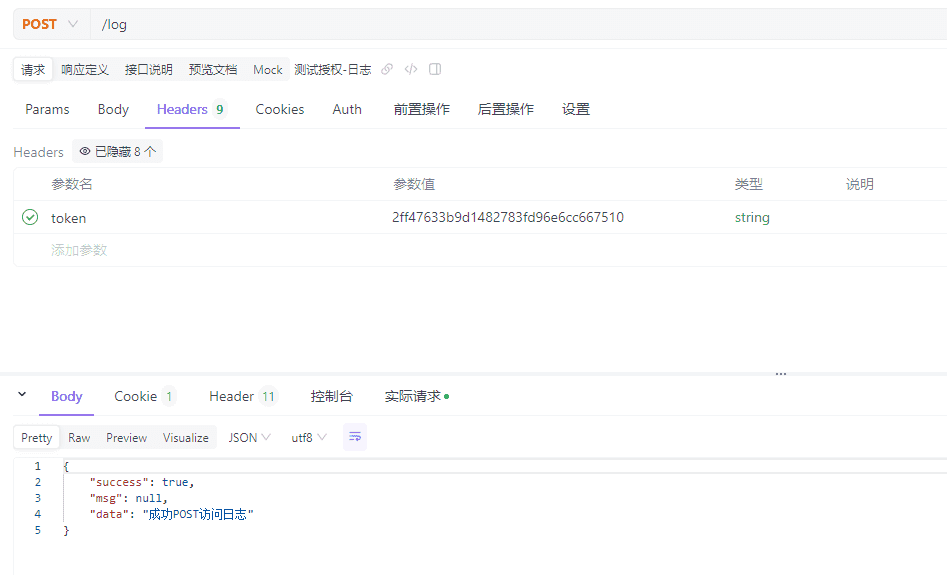
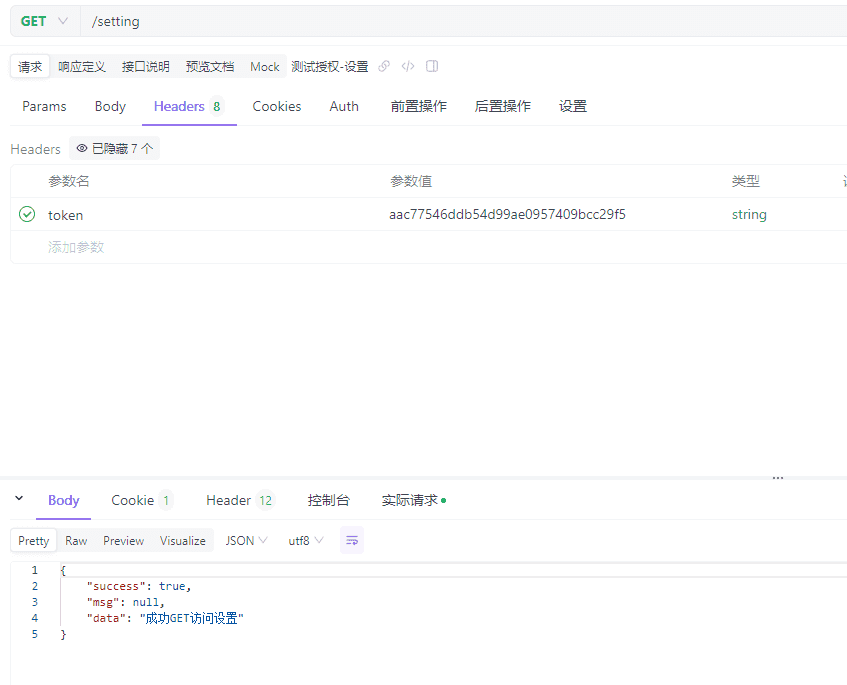
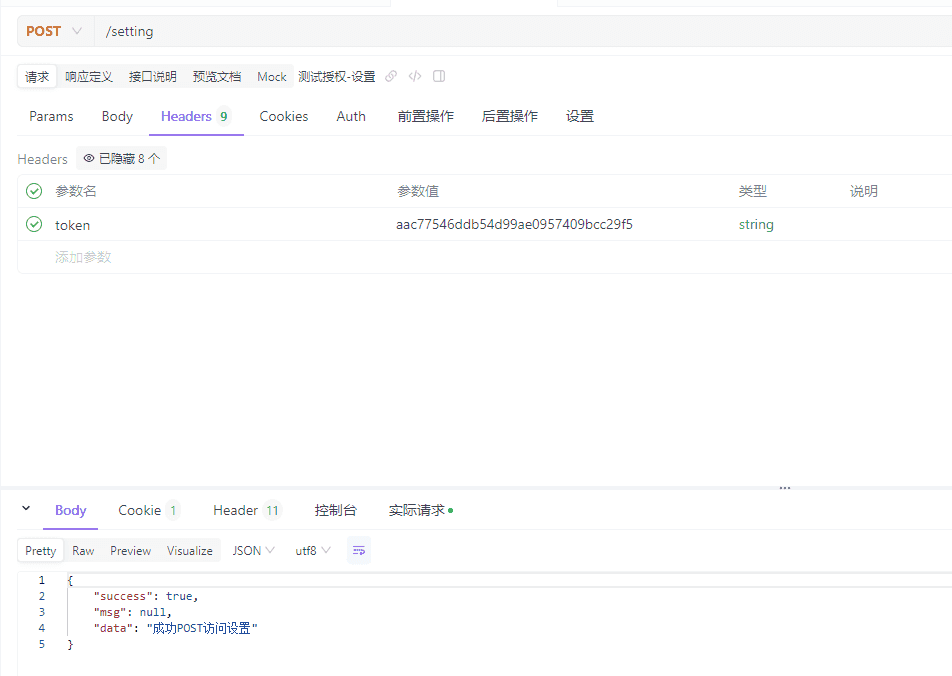
编写对日志进行GET和POST请求,和对设置进行请求的接口。
查看代码
@RestController
public class PermissionController {

    @GetMapping("/log")
    public Result GetLog() {
        return Result.success("成功GET访问日志");
    }

    @PostMapping("/log")
    public Result PostLog() {
        return Result.success("成功POST访问日志");
    }

    @RequestMapping("/setting")
    public Result testSetting(HttpServletRequest request) {
        String method = request.getMethod();
        return Result.success("成功" + method + "访问设置");
    }
}
实现前测试
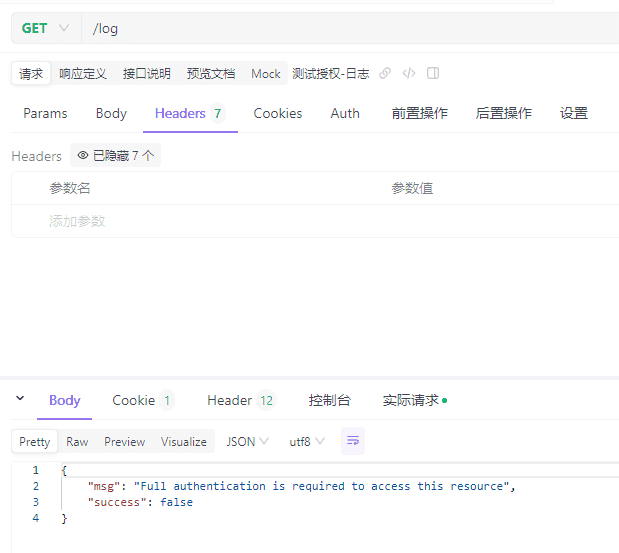
不携带token访问时,返回未认证的提示信息。
现在还没有权限控制,携带认证token可以访问所有接口。
 |  |
|---|---|
 |  |
定义权限信息源
我们的权限信息保存在数据库中,因此需要先查询数据库,然后保存到程序的某个类中,当然也可以保存到redis中,但为了减少访问redis的次数,这里是保存到一个LinkedHashMap中。
实现数据接口层
查询出所有未删除的权限名和对应的权限条件信息。
@Mapper
public interface PermissionMapper extends BaseMapper<Permission> {
    @Select("select permission_name, permission_path " +
        "from t_permission " +
        "where is_delete=#{isDelete}")
    List<Permission> findAllPermissions(@Param("isDelete") boolean isDelete);
}
自定义权限资源配置源
这个PermissionURLSource类实现SecurityMetadataSource接口,用于自定义权限资源配置源,核心作用是将URL映射到相应的权限配置上。
如果是第一次请求,请求映射集合requestMap为空,会进行初始化。它会首先使用PermissionMapper查询数据库中的所有权限,并为每个权限创建一个AntPathRequestMatcher,将其与对应的SecurityConfig对象(包含权限名称)一起存入requestMap中。
然后,它会遍历requestMap,检查当前请求是否与任何RequestMatcher匹配,如果找到匹配项,则返回对应的ConfigAttribute,即权限配置。
比如当前请求是/setting,就会在requestMap中查找到该请求需要设置的权限名,然后返回需要的权限名,交给决策管理器决定。
查看代码
@Component
public class PermissionURLSource implements SecurityMetadataSource {

    @Autowired
    private PermissionMapper permissionMapper;
    private final LinkedHashMap<RequestMatcher, ConfigAttribute> requestMap = new LinkedHashMap<>();

    @Override
    public Collection<ConfigAttribute> getAttributes(Object object) throws IllegalArgumentException {
        HttpServletRequest request = ((FilterInvocation) object).getRequest();
        if (requestMap.isEmpty()) { // 初始化资源权限路径
            List<Permission> permissions = permissionMapper.findAllPermissions(false);
            for (Permission permission : permissions) {
                String[] split = permission.getPermissionPath().split(":");
                String method = split[0];
                String path = split[1];
                SecurityConfig securityConfig = new SecurityConfig(permission.getPermissionName());
                AntPathRequestMatcher requestMatcher;
                if (Objects.equals(split[0], "ALL")) {
                    requestMatcher = new AntPathRequestMatcher(path);
                } else {
                    requestMatcher = new AntPathRequestMatcher(path, method);
                }
                requestMap.put(requestMatcher, securityConfig);
            }
        }
        Iterator iterator = this.requestMap.entrySet().iterator();
        while (iterator.hasNext()) {
            Map.Entry<RequestMatcher, ConfigAttribute> entry = (Map.Entry) iterator.next();
            if (((RequestMatcher) entry.getKey()).matches(request)) {
                return Collections.singleton(entry.getValue());
            }
        }
        return null;
    }

    @Override
    public Collection<ConfigAttribute> getAllConfigAttributes() {
        return null;
    }

    @Override
    public boolean supports(Class<?> clazz) {
        return true;
    }
}
定义权限决策管理器
实现数据接口层
在登录成功时,我们保存的是用户的角色名称,并不是具体的权限名。
因此我们需要在角色权限表中根据角色名,查询出对于的权限名。
@Mapper
public interface RolePermissionMapper extends BaseMapper<RolePermission> {
    @Select("SELECT p.permission_name " +
        "FROM t_role r " +
        "JOIN t_role_permission rp ON r.role_id = rp.role_id " +
        "JOIN t_permission p ON rp.permission_id = p.permission_id " +
        "WHERE r.role_name = #{roleName} ")
    List<Permission> findPermissionByRoleName(@Param("roleName") String roleName);
}
自定义权限决策管理器
这个PermissionDecisionManager类实现了AccessDecisionManager接口,作用是在用户请求一个受保护的资源时,决定是否允许用户访问该资源。
实现的方法是通过比较用户角色的权限与请求资源所需的权限,来决定是否允许用户访问该资源。
具体的实现在decide方法中,它有三个参数。
Authentication authentication:这个参数代表了当前的认证对象,登录成功保存在安全上下文(SecurityContext)的认证token。Object object:这个参数通常是一个FilterInvocation对象,它代表了当前的HTTP请求。通过这个对象,可以获取到请求的URL、方法、参数等信息。但是我们不需要使用这个,因为我们PermissionURLSource中使用了。Collection<ConfigAttribute> configAttributes:这个参数是一个配置属性集合,每个配置属性都关联了访问特定资源所需的权限。这些配置属性就是PermissionURLSource中getAttributes返回的。
这里为了简便,实现的是如果用户拥有所需权限的任意一个都允许访问。更精细的可以实现投票算法。
对于每个配置属性,它会遍历用户认证信息中的GrantedAuthority集合,这个集合包含了用户的所有角色。然后,使用rolePermissionMapper查询每个角色对应的权限。如果找到匹配用户角色和配置属性的权限,则允许访问,方法直接返回。
如果没有找到任何一个匹配的权限,则会抛出一个AccessDeniedException,表示用户没有访问该资源的权限。
查看代码
@Component
public class PermissionDecisionManager implements AccessDecisionManager {
    @Autowired
    private RolePermissionMapper rolePermissionMapper;

    @Override
    public void decide(Authentication authentication, Object object, Collection<ConfigAttribute> configAttributes) {
        if (configAttributes.isEmpty()) {
            return;
        }
        for (ConfigAttribute attribute : configAttributes) {
            for (GrantedAuthority authority : authentication.getAuthorities()) {
                List<Permission> permissions = rolePermissionMapper.findPermissionByRoleName(authority.getAuthority());
                for (Permission permission : permissions) {
                    if (attribute.getAttribute().equals(permission.getPermissionName())) {
                        return;
                    }
                }
            }
        }

        throw new AccessDeniedException("没有权限:" + configAttributes);
    }

    @Override
    public boolean supports(ConfigAttribute attribute) {
        return true;
    }

    @Override
    public boolean supports(Class<?> clazz) {
        return true;
    }
}
定义权限拒绝处理器
当用户的请求被拒绝时,PermissionDecisionManager就会抛出授权失败异常,AccessDeniedHandler会被调用来处理这个异常。
我们自定义一个PermissionDeniedHandler,实现AccessDeniedHandler接口。
具体逻辑和认证失败处理器一样,不同的是异常信息,我们同样返回异常信息。
查看代码
@Component
public class PermissionDeniedHandler implements AccessDeniedHandler {
    @Override
    public void handle(HttpServletRequest request, HttpServletResponse response, AccessDeniedException e) throws IOException {
        response.setCharacterEncoding("UTF-8");
        response.setContentType("application/json");
        String jsonString = JSON.toJSONString(Result.fail(e.getMessage()));
        response.getWriter().println(jsonString);
        response.getWriter().flush();
    }
}
定义权限检查过滤器
创建PermissionFilter类,它扩展了AbstractSecurityInterceptor并实现了Filter接口,它是授权组件中第一个接触请求的,用于指定权限决策管理器进行权限检查。
我们主要为这个类做以下工作:
- 注入我们自定义的权限信息源,为这个过滤器指定自定义的权限信息源。
- 注入我们自定义的权限决策管理器,为这个过滤器指定自定义的权限决策管理器。
过滤器的其他逻辑我们不多做修改,使用AbstractSecurityInterceptor原本的授权逻辑即可。
查看代码
@Component
public class PermissionFilter extends AbstractSecurityInterceptor implements Filter {
    @Autowired
    private SecurityMetadataSource securityMetadataSource;
    @Autowired
    PermissionDecisionManager permissionDecisionManager;
    @Override
    @Autowired
    public void setAccessDecisionManager(AccessDecisionManager accessDecisionManager) {
        super.setAccessDecisionManager(accessDecisionManager);
    }
    @Override
    public Class<?> getSecureObjectClass() {
        return FilterInvocation.class;
    }
    @Override
    public SecurityMetadataSource obtainSecurityMetadataSource() {
        return this.securityMetadataSource;
    }
    @Override
    public void doFilter(ServletRequest servletRequest, ServletResponse servletResponse, FilterChain filterChain) throws IOException, ServletException {
        FilterInvocation fi = new FilterInvocation(servletRequest, servletResponse, filterChain);
        InterceptorStatusToken token = super.beforeInvocation(fi);
        try {
            fi.getChain().doFilter(fi.getRequest(), fi.getResponse());
        } finally {
            super.afterInvocation(token, null);
        }
    }
}
配置security
主要是注入权限过滤器和权限拒绝处理器。
使用permissionFilter替代原有的FilterSecurityInterceptor。
指定当发生授权异常时使用permissionDeniedHandler。
@Autowired
PermissionFilter permissionFilter;
@Autowired
PermissionDeniedHandler permissionDeniedHandler;

http.
    .addFilterAt(permissionFilter, FilterSecurityInterceptor.class)
    .exceptionHandling(ex ->       ex.authenticationEntryPoint(authenticationEntryPointIHandler)
                       .accessDeniedHandler(permissionDeniedHandler))
实现后测试
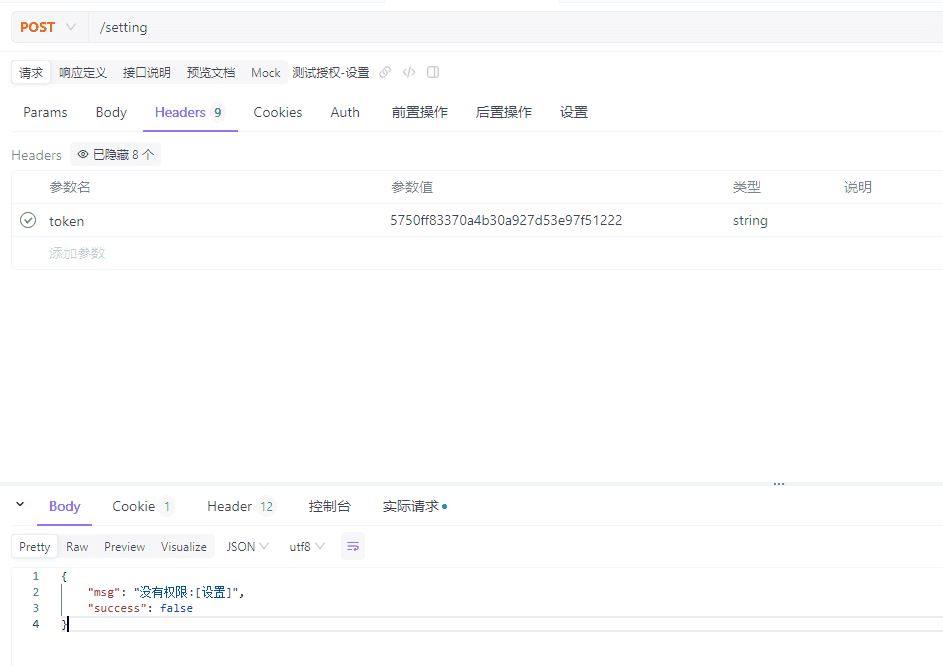
这次我们使用经理的账号进行登录,他只有访问日志的权限,没有访问设置的权限。
访问日志成功。
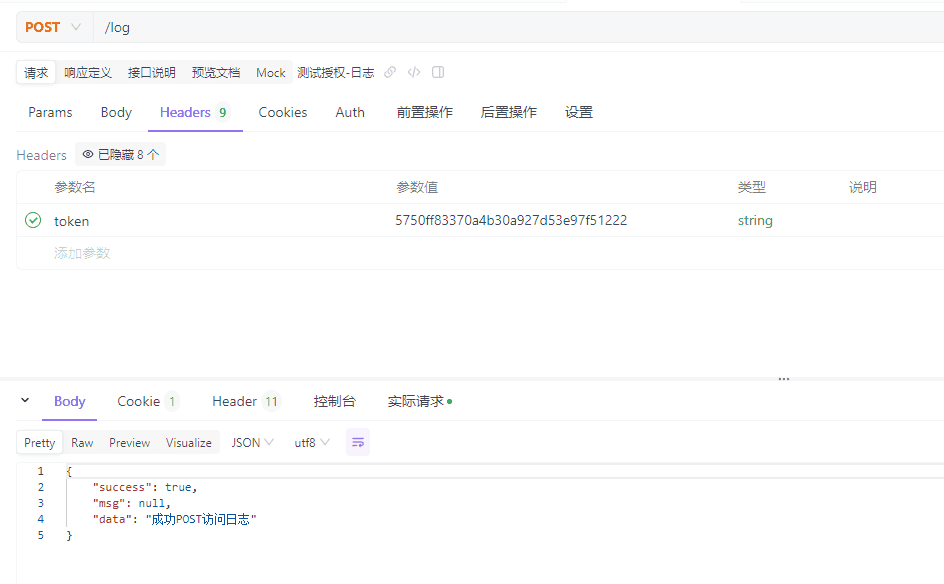
访问设置失败。
接下来测试星号。
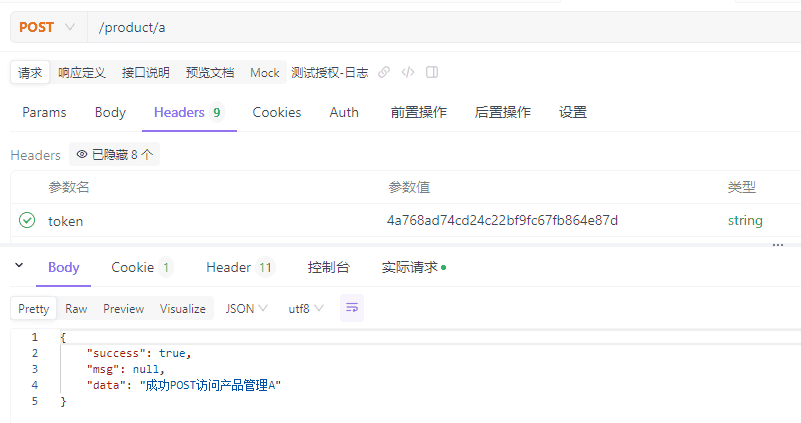
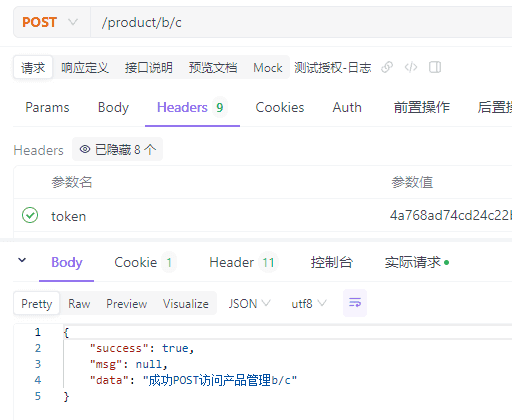
新建产品管理的权限,对应的资源是/product/请求路径下的所有接口。
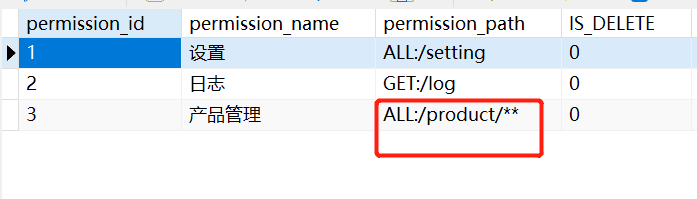
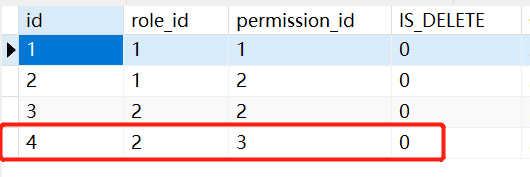
给产品经理角色添加这个产品管理的权限。
编写产品管理的接口,一个是/product/a,另一个是/product/b/c,都能匹配星号的规则。
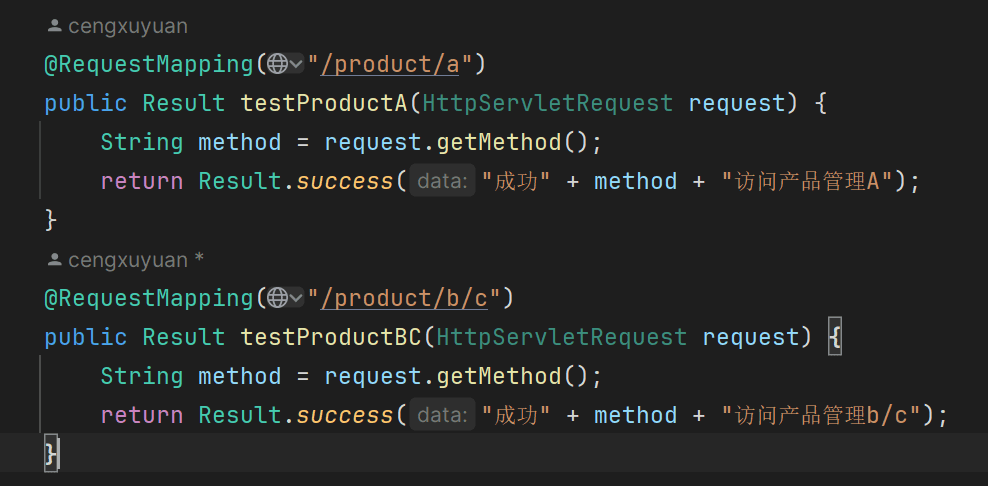
使用经理1用户登录,得到用户token。
访问这两个接口成功,说明星号匹配规则没问题。